
My mum and dad have had their family run nursery in Manchester for over 20 years now, and in that time, we’ve assembled around nine different polytunnels of various sizes. I’ve also had a few affordable garden/allotment type polytunnels (the green ones) at my mum’s and dad’s small holding (the grandkids refer to it as ‘the farm’). I like to think because of this, I’ve learned a thing or two about what makes a good polytunnel and what you need to take into consideration.

With this in mind, I’ve got a handful of polytunnels I recommend, both professional grade heavy duty polytunnels like we have on the nursery but much smaller, as well as some affordable green style polytunnels perfect for gardens or even allotments if you’re just getting started with growing in polytunnels.
In the past, I’ve talked about my favourite greenhouses for the garden as well as efficient greenhouse heaters. However, they have their limitations and are usually much more expensive compared to polytunnels of the same size. Polytunnels, even the more expensive professional models, offer excellent value for money.

The first thing to note, there is a massive difference between professional-grade polytunnels and garden/allotment polytunnels (usually green). For starters, the hoops on professional polytunnels are made from 33mm diameter thick walled heavy duty galvanised high tensile steel or similar like on this DirectPlants Straight Sided Professional Polytunnel Kit. They also have much more durable polythene covers, which can easily last 8-10 years if appropriately assembled. This means getting the cover as tight as humanly possible.
They also usually have much larger openings at either end, are taller, often as high as 9ft and can even have crop bars which you can hang very heavy 18-inch baskets from as well as run irrigation systems across them. You can’t do this with the cheaper polytunnels. The downside is price, they’re expensive, probably over grand or much more depending on the size.

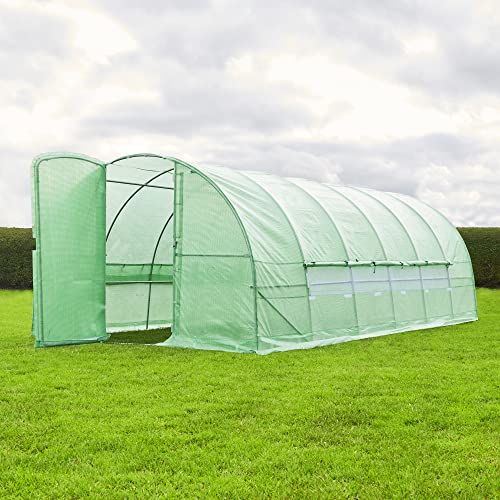
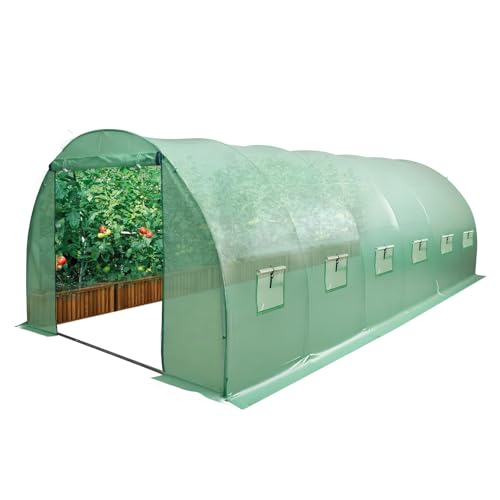
However, some of the latest garden/allotment polytunnels (green ones) have proven to be excellent alternatives and much more affordable, a quarter of the price. The trick is finding a decent one out of the hundreds of cheap, poorly made ones available with flimsy zipped doors and poor-quality covers. I’ve found that most of the cheaper ones come with 19mm steel frames. However, this FeelGoodUK PRO 6m x 3m x 2m Polytunnel has heavier 25mm galvanised steel rods that make up the frame that easily slots together.
This is why this is, without a doubt, one of the best polytunnels for gardens and allotments that I call affordable or beginner friendly. Something else that makes it stand out from most other polytunnels is, instead of the usual roll-up zipped doors, it also has a steel framed door which is much more durable. The door is also wide, giving easy access with wheelbarrows. To finish it off, it has a decent cover that can be dug into the ground like professional polytunnels. Finally, it also has a vent down one side for air circulation, a good height of 2m (6.5ft) in the centre and straight sides so you can still place those taller plants right to the edges. Basiclly this is a polytunnel that is affordable and well worth considering.


When it comes to the floor, you have a few options. You can use paving flags, build raised beds or even plant directly into the ground. We use weed control fabric in all our tunnels in the nursery, and it works well.
Finally, let’s talk about irrigation systems. I covered my watering systems in detail for raised beds here, watering systems for pots here and soaker hoses here. You could also rig an overhead sprinkler system and even automate the watering with a water timer. I upgraded to a LinkTap G2-S smart watering system at home to run sprinklers and dripper systems.
Best Polytunnels Reviews
1. FeelGoodUK PRO 6m x 3m x 2m Polytunnel
When it comes to polytunnels, it’s difficult to say which is the best polytunnel. It’s better to narrow it down between something professional like this DirectPlants 14ft x 12ft Straight Sided Polytunnel Kit-Heavy Duty Professional Polytunnel I review next, which costs upwards of £1000 for a 4m meter tunnel. The sheeting alone has a guaranteed lifespan of 5 years, but from experience, if fitted, probably (thats means very tight) can easily do 10 years even if in an exposed position.
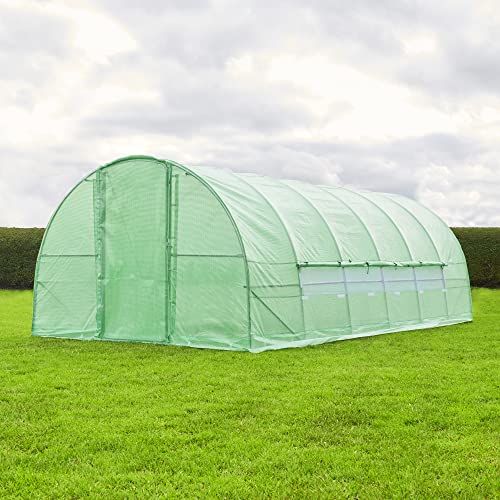
Then you have the more domestic polytunnels, of which the build quality varies massively. A quick search online will reveal hundreds of choices. You know, the ones with the green covers. With that out the way, I think this FeelGoodUK PRO 6m x 3m x 2m Polytunnel is a good size for the domestic garden or even an allotment. If it’s too large, they even do a smaller 4m x 2m x 2m version. However, more importantly, the build quality is above most other alternatives unless you go for a professional polytunnel.

What makes it any better, you ask? Firstly, the build quality is better; this has a 25mm galvanised frame. Most alternatives only have 19mm frames. This also has extra support bars, sometimes referred to as ‘storm bars’, which a lot of cheaper models don’t have.
Finally, the door is a framed wide door, much better than the zipped roll-up doors on most other alternatives. You can easily wheel a barrow through the doors, which is handy. Now, the canopy is not any better, it’s the usual 140gsm UPVC cover, which is UV protected, but it does have a vent that rolls up along one side.
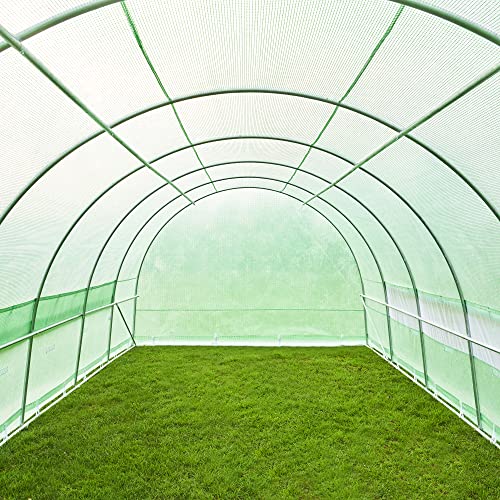
Overall, it’s just a decent sturdy and strong polytunnel. Something else often overlooked is this polytunnel also has straight sides. This means you have more height for tall plants right against the walls of the polytunnel.
A little tip to help prolong the life of the tunnel – get yourself some polytunnel hotspot tape and apply the tape all along the steel frame where the cover pulls over the frame. This will protect the cover from rubbing against the frame; this is what causes holes in the cover. All professional tunnels use it, and I wonder why it’s not provided with most tunnels.
The FeelGoodUK PRO Tunnel isn’t the tallest greenhouse, but at 2m, there’s enough room for most people to stand upright in it.
It’s easy to put the polytunnel frame together. The 25mm galvanised steel rods just bolt together, as does the door frame I mentioned earlier. There are additional corner rods that lend extra strength and stability to the structure in storms and windy times, which I’ve also mentioned. When it comes to installation, I recommend digging a trench around the polytunnel and burying the polythene sheet under the dirt as tight as possible. This is known as trenching and adds an extra element of steadiness to the structure and is how many professional polytunnels attach the sheeting. The trick is to get the cover as tight as possible; this is what helps prolong the cover’s lifespan.
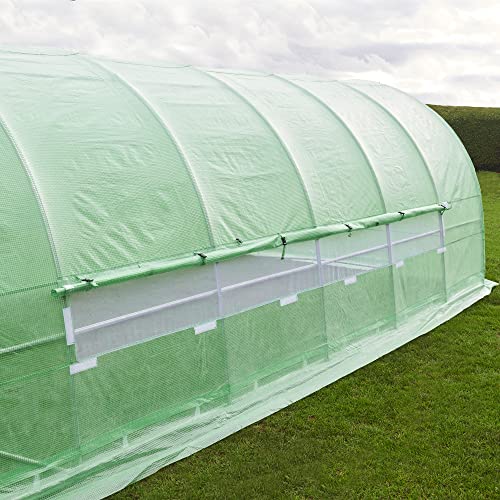
When it comes to ventilation, you can leave the door open. Or you can roll up the window covering of the four mesh windows on one side of the greenhouse. Unfortunately, you can only have all or none of the windows open at the same time.
But a handy feature is the window covering of the windows. This rolls up into an open tube and is held in place by Velcro tabs. When it rains, water collects in this tube. You can place a water butt at the end of the tube, and if you angle the tube correctly, you can collect the rainwater in the butt. And there’s a matching rain gutter on the other side of the polytunnel, even though there are no windows there.
Pros
- Single metal framed polythene door the height of the polytunnel is at one end.
- Polythene is 140gsm quality and lets in UV light for your plants.
- The frame is constructed of 25mm galvanised steel rods that bolt together.
- Ground bars can be pinned to the ground for extra stability.
- Additional corner support bars for strength and stability.
- A four-panel strip window runs along one side with mesh to keep the bugs out.
- The cover of the strip window rolls up to create a water catcher; there’s also a similar rain gutter on the other side of the tunnel.
- Dimensions: 2m (height), 3m (width), and 6m )length); 80cm (door opening).
Cons
- Polythene rubs on the metal rods and hoops, causing holes. The solution is to get some hot tape and stick it to the frame before attaching the cover.
My recommendation
This FeelGoodUK PRO Polytunnel is a good mid-size polytunnel and is a great choice for most gardeners who are considering this sort of tunnel for a garden or even allotment. I really like that it has a large steel framed full-size door. The 25mm steel frame is better than most, and overall, it’s just one of the better polytunnels out there before you start comparing them to what I call professional polytunnels. For the price, I think it’s a great tunnel thats been well thought out. Just don’t forget to order some Hotpoint tunnel tape to help protect the cover and get it as tight as possible.
2. DirectPlants 14ft x 12ft (4.26m by 3.65m) Straight Sided Professional Polytunnel Kit
I’ve worked in a nursery for most of my working life, many of it in polytunnels, thats because my family own a nursery. We have installed about 7 different polytunnels over the years, although teh last couple we had installed by professionals.
The problem is that these tunnels are too big for most gardens and even some allotments. However, this is where this 14ft x 12ft (4.26m by 3.65m) Straight Sided Professional Polytunnel Kit from Direct Plants fills this gap. It comes with everything that you need to set up your own mid-size polytunnel similar to those at nurseries and garden centres. It’s worth noting that they sell all different sizes of polytunnel to match your required size, but this 14ft x 12ft is a good size and price for most allotment patches.
They really are built to last, the covers alone ate guaranteed for 5 years, but realistically, they will last 8-10 years if installed correctly. The trick is to get the cover as tight as possible, which is very tight on these types of tunnels. If there is any give in the polythene cover, it will greatly reduce how long the cover lasts.
Basically, this model is considered to be one for the professionals or something looking for a professional grade polytunnel as it’s designed to maximise the growing space inside.
The polytunnel cover is made from industrial specification polythene. This is both anti-condensation and anti-fog. In addition, it’s anti-drip, so you won’t come in on damp days to find pools of water over the base of the polytunnel. It also acts to reduce the temperature inside the tunnel on hot days, keeping your plants at a cooler temperature. As mentioned earlier, you also need to trench the edges of the polythene. That is, to dig a trench around the tunnel and bury the edges of the sheeting underground. This adds extra stability, but as mentioned already, you need to pull that cover as tight as possible.
When it comes to the actual steel frame, the hoops and rods of this polytunnel are made from 33mm diameter thick walled heavy duty galvanised Z35 high tensile steel, which is sturdy and durable. To compare and give some perspective, the steel on the FeelGoodUK PRO is 25mm so there is a substantial difference in the steel grade. You really can’t compare the two, as this is in a different league.
The side and roof high tensile steel hoops are spaced at 1.8m (6ft) intervals. The diagonal corner hoops (also high tensile steel) help brace the tunnel in storms and on windy days. The ground poles are galvanised heavy duty steel, and you dig them into the ground or place them into a concrete base. These are what keep the polytunnel structure in place.
The maximising of space is possible as the lower 75cm of the walls are straight before the walls gradually curve up to a 2.75m height. This lets you grow taller plants near the edges of the tunnel. In my case, for example, on the nursery, this means we can grow clematis in 2-3ft canes right to the edges of the tunnel and maximise space.
You can also place bars across the tunnel over your head, traditionally on the nursery, we use crossbars in some tunnels to hang hanging baskets on using big S hooks. Or use the full height of the polytunnel to train really tall climbing plants.
Make note that the design of this polytunnel has an opening at both ends for a door, but doesn’t come with any wood for either door. You have to supply this yourself and build it to your own specs.
Pros
- Polytunnel walls constructed of industrial specification polythene.
- The tunnel is just less than 3m tall at its highest point.
- The sides are straight for 75cm before they start to gently curve.
- High tensile steel hoops are placed at 180cm spacing.
- Ground tubes are of galvanised heavy-duty steel and are hammered into the ground or put into a concrete base.
- Comes with full colour instruction manual and email or phone customer support, and a roll of repair tape.
Cons
- Doors are not included with the purchase, but you’re better off making your own and it’s easy enough.
My recommendation
The DirectPlants Straight Sided Professional Polytunnel is a kit that maximises the volume of space within its structure. The sides are straight for just over 2ft in height before gently sloping up to 2.6m tall to maximise the growing space right to the edge of the tunnel. This is a sturdy and durable polytunnel with industrial specification polythene for the cover.
The DirectPlants Professional Polytunnel Kit is a good choice if you’re looking for a polytunnel that will last for many years. You can easily expect to get 8-10 years out of one of these, just remember to get the cover extra tight.
3. Birchtree 6m x 3m Polytunnel
Buy on Amazon.co.uk
The Birchtree 6m x 3m Polytunnel gives you a large, climate-controlled growing space in your back garden. Its galvanised steel tubular frame is in six sections that are rust-resistant, lightweight and strong. Be aware that the manufacturer gives a strong warning that the product’s warranty does not cover damage due to wind or weather, so place your polytunnel in a sheltered part of your garden and make sure everything is tied down and the polythene pulled tight.
The canopy is made from a polyethylene (aka polythene) material of 140gm/m2 weight which is a middle-weight fabric. This plastic polymer is green with a checkered design and has a UV protection coating so the colour doesn’t fade and the material doesn’t become brittle over time. Of course, polythene is waterproof so your plants inside the tunnel are protected from the weather outside which is obviously the whole idea.
It’s easy to control the microclimate inside this Birchtree polytunnel. It has a roll-up full-width door at either end for the most cross ventilation. Along each side, the wall is a bank of six roll-up windows, each with a mesh screen to keep the bugs out but let fresh air through on warm days. If the airflow through the doors is too much, open one, some or all of the windows to circulate less air within the tunnel.
Some online reviewers of this product report that the frame is lightweight and may bend in wind. They recommend using extra support for the structure in addition to the rectangular portion of the frame that forms its base. Perhaps purchase guy ropes and stakes to hold it down and don’t position the tunnel where there are strong winds. But the manufacturer does recommend doing this for stability and also digging a shallow trench to place the frame into as well as the bottom of the polythene sheet to keep it tight, this is how the professionals do it, the ideal is not to let the wind get underneath the sheet.
Pros
- Ideal for the home gardener looking for a more professional setup.
- The six-sectioned frame is made of 25mm galvanised steel that’s anti-rust and strong.
- Canopy is of 140gm transparent polythene material in checkered green that’s UV protected so it won’t fade.
- Six roll-up flaps on each side leave you with windows of transparent material to let a custom amount of sunlight in.
- Doors at each end are zippered and roll-up for excellent ventilation and sunlight.
- Dimensions: 6m (length); 3m (width) and 2m (height).
- Weight: 45kg.
Cons
- Lightweight steel could bend in wind.
- Poor instructions although there plenty of videos online about how to put up polytunnels.
- Guy ropes and stakes not included.
Our recommendation
The Birchtree 6m x 3m Polytunnel is a large polytunnel for domestic use and is probably the best option before you venture into professional-grade polytunnels which are more expensive. If you don’t have enough seedlings and plants to fill it, consider using the extra space for storage or a gardening workshop. But make sure that you have enough air circulating inside for the plants that you do grow. The two doors and the 12 windows allow you to customise the microclimate inside the tunnel, whatever the weather is outside.
We like the Birchtree 6m x 3m Polytunnel for its size and ventilation options plus the overall build quality. It’s our choice for Best Polytunnel for Gardens as it a good combination of quality and affordability.
If you’re serious about starting your plants from seedlings and have enough room in your back garden for a large contained growing space, this could be the polytunnel for you.

Read next: Top 4 best lean-to greenhouses
4. Mi-invernadero 4m X 10m Professional Polytunnel
Buy on Amazon.co.uk

The Mi-invernadero 4m X 10m Professional Polytunnel is at it says – a professional polytunnel in size, materials but less unfortunately, in price. This polytunnel has features that suit a professional horticultural operation either on a smallholding or out on an allotment.
The professional-grade materials in this polytunnel include a galvanised iron frame that’s resistant to pretty much everything. It won’t rust and it’s durable enough to be left outside in all weathers even in high winds assuming it being assembled and fitted correctly. Iron as a metal has significant strength and this frame can last a good many years as can the quality cover it comes with.
The canopy is made of another heavy-duty material. The clear plastic canopy is of 800 gauge polythene whose thickness highlights its three-ply construction. Plastic is waterproof and keeps out the bad weather, but this canopy is also protected from UV-rays which can harm it and the plants inside the tunnel, the main thing is that it won’t perish from exposure to teh sun like cheap covers and will last for many years.
The tunnel has a single door at each end. The doors are designed as “real” doors, that hinge open at one side. You don’t have to roll them up and so let all the warm air out. Just open the door in the normal way and close it quickly behind you, thus preserving the microclimate that you’ve worked hard to establish inside the tunnel. There’s also no adjustable opening for extra internal ventilation as there are no windows but you can leave the two large doors open to ventilate the tunnel when needed.
The structure of this polytunnel is very stable, with 1m between each of the nine 25mm iron arches. Six horizontal and four diagonal bars keep the frame in place. In addition, the canopy is extra-long at the sides. Bury this excess in the ground and stake it down for extra stability.
Pros
- Galvanised iron frame resistant to bad weather and durable.
- Fixes to the ground using (included) omega irons, stakes and a thick 800 gauge plastic cover.
- Plastic canopy is 800 gauge and clear, with UV protection to resist breakdown by the sun’s rays.
- The single door at each end opens in the regular door way for easy access.
- Nine arches, six horizontal bars and four transversal bars keep this polytunnel upright and secure in all weathers.
- Dimensions: 10m (length); 4m (width) and 2.2m (height).
Our recommendation
The Mi-invernadero 4m X 10m Professional Polytunnel has all the features of a professional polytunnel – size, materials and features, including those to keep the structure stable. This is the largest polytunnel in our review and sits nicely on a small holding or an allotment. The frame comes in five pieces so it’s easy to transport and assemble on-site, more importantly, the frame is extremely strong as is the cover, professional-grade.
We like the Mi-invernadero 4m X 10m Professional Polytunnel for its size and its attention to the needs of professional or amateur large-scale horticulturists. It’s our selection for Best Polytunnel for Allotments as well as our Runner-up overall.
If you are in the business of selling plants, fruits or vegetables or providing for a large group, take a look at this professional-grade polytunnel for many years of outdoors/indoors growing space.

5. VonHaus 3m x 2m Polytunnel
Buy on Amazon.co.uk

The VonHaus 3m x 2m Polytunnel is the smallest polytunnel in our review. It’s a basic polytunnel with a few of the extra features that higher-end tunnels usually have.
The tubular steel frame is powder-coated which gives protection from weather and rust and extends the life of the structure. The polythene canopy is green with a check pattern over a clear base.
The side walls of the canopy are extra long. This is so you can bury the canopy in the soil or under sand, giving the structure extra stability in strong winds. Some online reviewers report that the canopy doesn’t fit tightly enough to the frame and flaps around in the wind, distorting the light steel frame. Some of the polytunnel owners tried lashing down the structure with guy ropes and state that it takes a lot of ropes to do so successfully. From experience with polytunnels tunnels, its doent matter how good the polytunnel is, you need to get the cover pulled really tight over the frame and then buried under the soil in a trench.
This tunnel has one door and that’s at the front of the tunnel. It’s an interesting door as it opens like a regular door but it’s shaped as one half of an arch. The door is almost the same height as the tunnel (2m) and is half the width, and gives you a large space to manoeuvre yourself and large bags of soil through. However, a few online reviews describe how the zipper around the door keeps catching in the Velcro there. Fairly high up on the back wall is one roll-up window, covered with mesh to keep out insects and other bugs. A bank of three windows sits low in each of the side walls. The doors and windows, together, provide you with all the options for air circulation and cross ventilation you ever need.
Pros
- The tubular alloy steel frame is powder-coated for rust and weather resistance as well as long life.
- Heavy-duty cover is made of polythene with extra length on the sides to bury for stability.
- Six roll-up mesh windows to let sunlight and air flow in for the best environment for your growing plants.
- The half-arch door at the front of the tube preserves the humidity inside the tunnel.
- Dimensions: 3m (length); 2m (width) and 2m (height).
Cons
- Cover catches in the wind and distorts the lightweight frame.
- Instructions are very poor.
- Door zipper catches in Velcro.
Our recommendation
The VonHaus 3m x 2m Polytunnel Greenhouse is a small polytunnel for use in your back garden. It has some high-end considerations (e.g. extra-long canopy) but online reviewers identify some basic problems that are common to most polytunnels. The single hinged door is a useful feature to preserve the internal microclimate as you enter or leave.
We like the VonHaus 3m x 2m Polytunnel for its small size and extra-long canopy for stability. Yes, it has the same set of problems as most other polytunnels, but this could be the right polytunnel for you if you’re just starting out growing seedling or more tender plants and don’t want to invest much time, money, space and effort at the beginning.

6. Vounot 4m x 3m Polytunnel
Buy on Amazon.co.uk

The Vounot 4m x 3m Polytunnel Greenhouse is twice the size of our previous polytunnel, the VonHaus 3m x 2m Polytunnel Greenhouse, but (as at December 2020) is less expensive. This Vounot tunnel has more of the straightforward features that you expect to find in a basic polytunnel, though.
The galvanized steel tube frame has five arches to support the structure, along with the necessary horizontal braces. As with all models, you need to dig a trench in the ground and place the bottom part of the frame into the ground. While doing this, extend the bottom of the canopy out and also bury it in the ground. This gives the structure stability during heavy winds in two different ways. Four pegs are included with the tunnel to stake the buried canopy down. You may have to buy more stakes yourself, depending on where you place the structure.
The canopy is the standard weight of 140gm/m2, with UV protection for longer life and shielding from becoming brittle over time. Some online users complain that the canopy is too loose over the frame and that there are not enough Velcro ties to hold it securely on to the poles. This, however, doesn’t seem to be a deal-breaker as once buried in the ground the cover should hold everything in place if not correctly.
At one end of the tunnel is a full-width roll-up door. There’s plenty of room to take your garden equipment inside if you’re using part of the polytunnel for storage. There’s no ventilation option in the other end of the tunnel, so you must use the windows in the side walls for cross ventilation. You have plenty of options with four roll-up windows per side wall, each with mesh in them to keep any flying things outside.
Pros
- Ideal polytunnel for gardens at an affordable price.
- Galvanised steel tube frame which shouldn’t rust.
- Canopy is from reinforced PE material of 140gm/m2 that’s waterproof and UV-rays protected for durability.
- Eight roll-up windows, four on each side, have mesh protection from bugs.
- The roll-up door at one end has plenty of space to enter through for you and your garden equipment.
- Extra-long canopy to bury in the ground for stability.
- Dimensions: 4m (length); 3m (width) and 2m (height).
Cons
- Comes with only four stakes.
Our recommendation
The Vounot 4m x 3m Polytunnel is another polytunnel that has all the basic features that you need to grow seedlings, cuttings or tender plants. This tunnel gives you a significant 12m2 of growing area (more if you put in shelves or benches) that should suit the average to enthusiastic home gardener. The door of this tunnel is the full width of the structure so you can easily take in your garden equipment if you’re using some of the internal area as storage space.
We like the Vounot 4m x 3m Polytunnel for its growing area that suits the enthusiastic home gardener and is affordable price.
If you’ve outgrown your current, smaller polytunnel, perhaps one you usually place over a cold frame or you’re really into growing all your plants from seedlings, this could be the perfect size polytunnel for you.

7. Outsunny 4.5m x 2m Galvanized Steel Polytunnel
Buy on Amazon.co.uk

The Outsunny 4.5m x 2m Galvanized Steel Polytunnel falls, size-wise, in-between the previous two polytunnels in this review. It’s similar in materials and features to the Vounot 4m x 3m Polytunnel Greenhouse, but this is the least expensive of the polytunnels we review at the time we compared them.
The Outsunny polytunnel has a metal frame constructed of galvanised steel. The steel is powder-coated for durability and rust resistance, though if the coating comes off, be sure to repaint a protective coating on to the metal. The steel tubes are 18mm in diameter and are screwed together, so you can place them tightly against each other for security. Adding to the structure’s stability are the four pull ropes and ground stakes that serve to keep it connected to the ground in times of high winds. Some online users, however, say that the four ropes aren’t strong enough and have been known to snap.
The transparent white polythene canopy is gridded and has the usual UV-protection against becoming brittle with age due to UV-rays. But some reviewers of this product online say that the UV protection doesn’t work very well and others state that the coating was unevenly applied to the fabric.
A double-zippered door is in one end wall and runs the width of the tunnel. Roll up the door and secure it with the tie at the top to enter and leave the tunnel and also to let more air flow in. Four mesh windows run along each side wall for cross ventilation to adjust the microclimate the plants are growing in.
Pros
- Powder-coated galvanised steel from is rust-resistant and long-lasting.
- Steel poles connected with screws for the more stability and security for the structure.
- Gridded polythene cloth is transparent white and protected from harmful UV-rays by a coating.
- Double-zippered full size door pens for entry and to circulate the air to change the internal microclimate.
- Two banks of roll-up mesh windows provide cross-ventilation to keep your plants at the right temperature.
- Comes with four ropes and four ground stakes, plus overlong canopy, to tie the polytunnel down and to bury part of it for stability.
Cons
- UV protection not evenly put on the canopy.
- The powder coating not evenly sprayed on poles.
- Stability cords snap when high winds.
Our recommendation
The Outsunny 4.5m x 2m Galvanized Steel Polytunnel is a middle size of the home garden polytunnels we review but it’s the least expensive one, at least when we did this comparison. The canopy is a translucent gridded white polythene so it won’t stand out too much in your garden. This model has many of the same features as our other domestic polytunnels, including guy ropes and an overlong canopy as stability features. Your choice may come down to the area of the garden you have available in which to put your growing space to extend your growing season in spring and autumn.
We like the Outsunny 4.5m x 2m Galvanized Steel Polytunnel for its white colour and for the optional size of growing space it offers. If you’ve calculated that you can give over around 9m2 of your garden to a polytunnel, this one is a good choice.

Buyer’s Guide
All polytunnels have basically the same structure and function – they’re long tunnels of polythene fabric stretched over a metal arched frame to create an internal microclimate that suits growing plants, especially seedlings, cutting and more tender plants that you then transplant into your garden or allotment. It also protects the plants from frost and extends the growing season by a number of weeks early on and later in the season. If that sounds a little familiar, it’s what greenhouses do but within a (usually) less permanent structure.
My Buyer’s Guide describes the important features to look for in a polytunnel for your allotment or garden.
Structure
A polytunnel’s structure is in two main parts.
Frame
The metal frame is generally made of steel tubing, with a series of arches along the length of the tunnel supported by horizontal and diagonal cross braces along the sides. All but one of the models we review are made of galvanised aluminium; the Mi-invernadero 4m X 10m Professional Polytunnel is constructed of galvanised iron which is heavier but more sturdy. These tubes/poles are bolted or screwed together in various ways.

One common complaint that we ran across in our research was that the pre-drilled holes in the frame pieces weren’t lined up properly and the new owners had to either make the holes larger or drill them again themselves. Be prepared to DIY to some parts of the structure.
Canopy
The canopy of a polytunnel is in one piece and is made of polythene, a durable plastic. This material comes in various weights identified as gms per m2. The higher the number of grams, the heavier/thicker and more durable the fabric is. Of course, plastic is waterproof and most of the tunnels in this review are also protected from UV-rays which is super important if you want it to last. This stops harmful UV rays from entering the tunnel and also stops the colour of the plastic from fading and from becoming cloudy over time. UV-protection also stops the polythene from breaking down and becoming brittle over time.
Within the canopy are doors for entry and windows for ventilation.
Doors
A polytunnel may have a door at just one end or a door at both ends of the tube. The door may be singe width or a double door. Many cheaper garden polytunnel models have a roll-up door made of the canopy fabric, with zips on either side. Just unzip the door, roll it up and use the ties at the top to keep it open.
In contrast, the Mi-invernadero 4m X 10m Professional Polytunnel’s door is a single door that is on hinges and opens like a regular door.
Keep in mind that an open door affects the internal micro-environment of the tunnel. Choose a design that you know that you’ll remember to keep closed when you work in there.
Windows
All of the polytunnels we review have roll-up windows in the side walls for ventilation and for air circulation to adjust the microclimate within. The windows are placed in the lower part of the walls and have an internal mesh covering to keep all the bugs out. As with roll-up doors, just roll the canopy covering to the top of the window opening and tie it out of the way. The banks of windows are situated across from each other so you can cross ventilate the interior of the polytunnel.
Stability
Another frequent criticism of polytunnels on review sites is that they don’t last long in windstorms. They get damaged or blow over, or wind gets under the canopy and it balloons up and pulls the frame out of shape. While this sometimes happens, it need not if you are careful about how you position and tie down your polytunnel. This really comes down to fixing the cover down properly and burying it under the soil in a trench.
We suggest you use an anchoring kit to attach the tunnel to the ground and also dig a shallow trench to drop the structure into. These are two of the ways to keep your structure stable, if positioned in an open space, we suggest that you use both of them at the same time and get the sheet as tight as possible around the frame, the the big secret.
Another method to achieve the immovability you need is to bury the lower part of the canopy walls in the ground and to cover that bit with soil. The Outsunny 4.5m x 2m Galvanized Steel Polytunnel in our review comes with an extra-long cover so that you don’t lose any of the structure’s height by burying part of it. However, not all models of polytunnel do, so, if you’re tall, you might not be able to stand up easily in the structure about using this stability method.
Burying the polythene canopy has other advantages as well: it keeps pets and pests from burrowing under the walls and getting in; it stops weeds creeping in from your garden, and it stops cold draughts from finding their way in from gaps under the walls.
Be thoughtful about where you place your polytunnel to be sure that you’re able to use as many of these stableness methods as possible.
Size

We recommend that you buy the largest polytunnel that fits into your available garden space. Remember that you don’t have to heat the polytunnel yourself – the sun does that for you but you can install a greenhouse heater if you want to keep it above a certain temperature. And the windows and doors supply the air circulation rather than an electric fan.
So having a large structure doesn’t cost more to operate than a smaller one. If you don’t currently plan on using all that growing area for seedlings and plants, you can store your garden equipment there or create another workspace or potting bench. Maybe you’ll expand your pre-season growing in the future. But these same experts also warn not to buy a polytunnel that’s too long (about 30m) so that you have an unused, unventilated area in it.
Final Conclusion
A polytunnel gives you a relatively large pre- and post-growing season space to start your seedlings and cutings for spring planting and to harden your plants for winter dormancy. And with less expense than an equivalent-sized greenhouse. And if you have an allotment, you’ll feel safer having a polythene structure out here than a glass one. Customise the micro-climate inside the tunnel by opening the doors and windows to circulate the air or cross-ventilate the air flow. And there’s plenty of room for you and your friends and family to potter around on a beautiful spring, summer or autumn day.
If you do decide that you really prefer a glass greenhouse, we can help there too. Our Best Greenhouses and Best Mini Greenhouses reviews contain excellent information and recommendations.
For making the most of the growing space in your polytunnel, find our recommendations in the Best Greenhouse Staging and Shelving Products review.
If you’re hesitant about starting out with something the size of a polytunnel, we recommend using a much smaller cold frame. We have recommendations about these in our Best Cold Frames article.
Last update on 2026-04-12 / Affiliate links / Images from Amazon Product Advertising API
