
Before I even thought about writing this buying guide on automatic watering systems, I had already had over 15 years years of experience setting them up, mainly sprinklers and dripper systems both outside and inside greenhouses/polytunnels from working at my family’s nursery for most of my life.
The watering systems I normally set up are not really suitable for most people setting up a watering system at home because you need specific tools to make the holes and pipe cutters, water pumps, specialist pipe fitting etc.

I look specifically at ready-made watering systems to make them simpler to install. In my Buyer’s Guide, I go over some information about the features of the best automatic drip irrigation systems so you can make an informed decision about which one to buy.

In my Best Automatic Watering Systems review, I take a look at four different garden watering systems, plus the different watering timers, so you can automate the whole system and even control it from your smartphone as I do.
Not all watering system kits come with a timer, and if you’re building a DIY system, you definitely need to purchase your own, which is what I did. In fact, I have now updated to a Wireless LinkTap G2-S smart water timer which was a real game changer, but I also use the simple but reliable Orbit water timer.

Remember, you can still have a watering system without a timer. You just need to switch it on at the tap manually and use diverters if you have several areas you water independently.
In this review, I wanted to show you the best automatic watering systems anyone could set up in an afternoon with no specialist tools. However, they also needed to be of good quality, durable, have control over the water output, easy to install and reliable.
Best automatic watering systems:
- Hozelock Easy Drip Universal Watering Kit for Beds and Borders – BEST PICK FOR BEDS AND BORDERS – Personally tested
- Hozelock Easy Drip Micro Watering Kit for Pots and Containers – BEST PICK FOR POTS – Personally tested
- GARDENA Starter Set Flower Pots M: – The Micro-Drip System Starter Set for seven potted plants and three plant troughs
- Hozelock 20 Pot Automatic Watering with AC1 Timer – A budget-friendly option with a water timer included, great for occasional use if on holidays
- Orbit ‘Buddy HF’ Single-Port Digital Tap Timer – An affordable water timer that is durable, reliable and tested by myself – Personally tested over 4 years
BEST PICK FOR BEDS AND BORDERS
First things first, I cover two main different types of systems. Both are what I think are the best choice for most gardens and allotments. They are proven, as I have been using them for the last few years now and have been very pleased with them. It’s important also to note that it’s also easy to get spare sprinklers and parts etc. This is important if you need to do repairs or if you need to expand the system at a later date. They are also compatible with other watering systems from other brands, which is also important.
My first choice is this Hozelock Easy Drip Universal Watering Kit for Beds and Borders, as shown in the picture above and below. I have reviewed it in more detail further down this review, including installation.
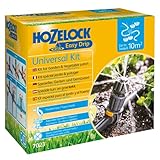
In short, this sprinkler system uses 15mm piping and adjustable sprinklers that simply clip over the 15mm black pipe and use a clever system where you twist the grey part of the sprinkler, and it drives a steel tube into the pipe. No using tools to make holes in the pipe and trying to push the sprinkler grommets into the piping like on some watering systems.
You can see how it works in the two pictures below!
I have actually been really impressed with this system as you I have personally been using them in raised beds outside. I like how you can easily adjust how much water they let out on each sprinkler independently. If you have a greenhouse and need to install a watering system (currently in the process of doing this myself), then this watering system is perfect for installing if you grow plants in the ground in rows.
Read the full review and installation
BEST PICK FOR POTS, TROUGHS AND HANGING BASKETS
When it comes to watering pots, hanging baskets and troughs, the best watering system is those that have drippers rather than sprinklers. They allow you to water within a specific area in a controlled way. I have recently installed a new drip watering system after being very impressed with the sprinkler system by Hozelock in my raised beds, which have adjustable sprinklers.
I noticed rate that they also did a drip system version where you could adjust the water flow. On most dipper systems for pots, the water flow that drippers out are set (for example, 4 litres per hour in the case of the Hozelock 20 Pot Watering Kit). The issue I have had with these types of drip systems in the past and bare in mind I have installed thousands of them over the years in nurseries. If you have large pots and small pots, you can only really water them with the same amount of water. This means either the larger pots don’t get enough water or the small pots get too much and can start to rot from over-watering.
This is why I decided to remove the older system and install this Hozelock Easy Drip Micro Watering Kit for Pots and Containers. It uses micro tubing, so it doesn’t stand out too much in your garden and is easy to hide. It’s easy to clip to walls using cable clips.
The main feature I really like that really separates it from most other drip systems is that you can adjust the water drip rate from very slow to consistent drip. This means I can provide bigger pots with more water and smaller pots with less so each plant gets the ideal amount of water. It may seem simple, but it really does improve the overall quality of the plants.
I also like that it’s super easy to install and can easily be done in the afternoon. A little tip is to put the end of the micro tubing in a cup of boiling water for a few seconds before pushing the dripper into the end of the tubing.
This makes them much easier to push onto the tubing and when it cools it shrinks and gives a water tight fit. Dio not heat them with a flame, this doesnt work!
You can read the full review and installation further down by clicking here

Best Automatic Watering System Reviews
1. Hozelock Easy Drip Universal Watering Kit for Beds and Borders
BEST PICK FOR WATERING BEDS AND BORDERS
Buy on Amazon.co.uk
The Hozelock Easy Drip Universal Watering Kit for Beds and Borders, like the Hozelock watering system for pots I review further down, is designed for specialised areas. The plants in your beds and borders will never dry out once you’ve installed this system. This is a good alternative to using a soaker hose which I have also reviewed here.
The first thing to note is that it’s much easier to set up an automatic watering system in spring when there is less plant growth, or even better, before you plant up your beds and borders. You can also choose to have the pipe on the surface of the soil (like I do) or just underneath the soil surface to hide the pipe. It’s a personal choice. Once the plants grow out in summer, there is not much of the watering system actually visible.
I purchased this watering system and have used it in my raised beds, however, it’s also suitable for garden borders, and you could also install it inside a greenhouse if you wanted to.

In terms of how far this kit will go, this kit will cover around 15 meters in length and just so happens to be just over the total length of my recently installed raised beds that are around 15 meters long in total. I have three of them, each around 5 meters long. If you have a large bed it will cover around 10m2 of garden beds and borders.
Now a little tip is to install this when the temperatures aren’t freezing so that the flexi pipe is supple enough to twist and turn into position. It was cold when I installed my most recent watering system, so the flexi pipe was a little stiff, making it a little more difficult to install, it wasn’t a big deal though and I still managed to get it set up without any issues.
The first thing you need to do is position the flexi hose where you are going to install it, then you can arrange the sprinklers where you think you will need them. I always space them around 1 meter apart, and it works well.
Talking of installation, all the fittings are either pushed together and then screwed to fix them into place or clipped together. Set-up is super easy. No tools are required, which is always a bonus.
The only thing you might need is a mini hacksaw/saw to cut the pipe if it’s too long.
What I really like about the design of this system is the way you attach the sprinklers themselves to the pipe. I have seen no other design which is the same as this and it made them so easy to fit. This is really why you need no specialist tools.
Basically, you slide the sprinkler head onto the pipe and close the clip.
After this, you push on the yellow tab and then turn the grey screw section. This makes a sharp needle-like spike go down into the pipe.
I thought this design was amazing because you didn’t need to use any tools to make a hole in the pipe to insert the sprinkler head which is how most systems work. They really have made it easy for anyone to install.
It’s also worth noting that this system also comes with some caps to seal the pipe should you add a sprinkler and then change your mind about having one there. You would obviously be left with a hole and jet of water, so having these caps that clip around the hole come in very handy. Get everything lined up beforehand so you know exactly where the sprinkler is going to be to avoid needing to use these.
Once I have the pipe in place and have attached all the sprinklers, I like to attach the spikes that slide into place and drive them into the soil, keeping them nice and secure.
Next, I connected the attachments so they can be connected to the hosepipe, as shown above, and alternatively, you can also connect them straight to an outdoor tap. At the moment, I just attach the hosepipe. However, I am in the process of extending the flexi pipe right to my outdoor tap, where my timer is installed on a flow diverter, so I don’t need to attach the hose pipe to use it. This way, it is fully automated.
Once everything was lined up, I noticed that the pipe was slightly too long for my bed and needed shortening, so I cut the end of the pipe. I then attached the end cap, and this simply slides over the pipe, tightening into position by rotating it.
I like that everything you need is supplied in this kit, including 10 drippers. The drippers can water up to 100cm around them, so roughly 50cm around the sprinkler. You can adjust how far the sprinkler waters are by rotating the nozzle heads.
One last thing you can do with these sprinklers once they are attached to the spikes is to rotate them 90 degrees and use them more as a dripper than a sprinkler. I know some people prefer this, so it’s worth noting that you can use them like this too.
Finally, a timer is not included withthis system. To make it an automatic watering system, you will need to purchase a timer yourself, which is what I do. This does give you the freedom to choose a timer from any brand that best suits your watering needs. The two I own and recommend are this LinkTap G2-S Wireless Water Timer & Gateway and this Orbit Buddy HF Single-Port Digital Tap Timer.
Pros
- Drip watering system so water doesn’t evaporate before it reaches your plants.
- Waters beds, borders and vegetable gardens of less than 10m2 area for optimal growth of your plants.
- Set up is easy and takes only about 15 minutes of your time.
- The flexi hose is 15m long and can be cut to size.
- Works with any water controller/timer to make it an automatic watering system.
- Connect the kits together if you want to water more than 10 m2 of plants.
- Included in the kit are 10 drippers that can water up to 100cm around them for extensive coverage of your beds.
- The warranty is for two years.
Cons
- Doesn’t come with a timer.
Our recommendation
The Hozelock Easy Drip Universal Watering Kit for Beds and Borders can water up to 10m2 of beds and borders or a 15-meter length, which is what I did with it.
The Hozelock Easy Drip Universal Watering Kit for Beds and Borders is my Best Pick for watering beds and borders. Being able to water extended areas by adding other kits is a plus if you want to irrigate large flowerbeds.
It’s worth looking at this watering system if you’re looking for a way to automate watering your beds and borders. This comes in very handy if you’re going on holiday or just want to make life easier. Just remember to buy a timer as well, or you will need to manually turn the tap on every time you need to water.
Read next: The best home greenhouses
2. Hozelock Easy Drip Micro Watering Kit for Pots and Containers
Best pick for pots and containers
For pots and containers, this is by far the best watering system to set up I have now had it installed for probably a couple of years. I’ve already talked about this watering system earlier, so I’ll try to keep it short and get straight to the point, but I wanted to cover installation as it really is simple.
So as discussed already, it’s the adjustable sprinkler heads are what I really like and have been impressed with. So you can adjust the flow rate on each sprinkler head by rotating it depending on the size of the pots and plants.
A couple of things worth mentioning, you get 15 meters of micro tubing and 15 T pieces, and 15 sprinklers to use, so enough to water 15 pots.
So first, I decide where I want to install the water system and make sure I have enough micro tubing to cover the distance I need. I then attach the connector by pushing the tubing unto it, and then this screws onto the tap, as shown above.
In my case, I screwed it onto the water diverter that is connected to my water timer so I can water my pots and raised beds at the same time, as shown above. I also have my lawn sprinkler and auto hose reel connected, but these can be turned on and off as needed on the water diverter.
All you need to do then is use the T pieces to divert the short piece of micro hose off every meter to water your pots. You can then simply tack the micro tubing to the wall with cable clips, as shown below.
You can see in my photo below I actually made a bunch of the short lengths with the drippers attached, ready to fix into position.
All I need to do then is slide the stakes over the micro tubing next to the drippers themselves.

Once this is done and everything is set up, all you need to do is place them in your pots and baskets and adjust the amount of water they drip out.
It’s also worth noting that for my wall troughs, I had two drippers in each trough to ensure they got enough water as they are 3ft long.
Pros
- Easy to setup, everything is push fit just don’t forget to soak the end of the micro tubing in boiling water for a few seconds before pushing the connections into the tubing.
- Easily adjust the amount of water each pot gets using the adjustable nozzles.
- Easy to expand and add to if needed.
- A maximum flow rate of 40 litres an hour, compare this to the 4 litres an hour for the none adjustable types.
- Easy to attach to an outside tap, water diverter or straight to a water timer.
Our recommendation
If you have pots and containers, this drip system is bar far the easiest and most efficient way to water your plants. The adjustable nozzles are what really separates this from other cheaper drip systems.
Quality-wise, it’s fairly durable and made from much better quality plastics than most of the drip systems I have used in the past where the nozzles can snap off if you are not careful. If this is within your budget, this is what I recommend for pots and containers as well as hanging baskets. Don’t forget, I also use this Hozelock easy micro drip system myself. Combine this with a watering timer, and you have yourself a really useful and effective hands-off watering system.
3. Hozelock 20 Pot Automatic Watering with AC1 Timer
Buy on Amazon.co.uk
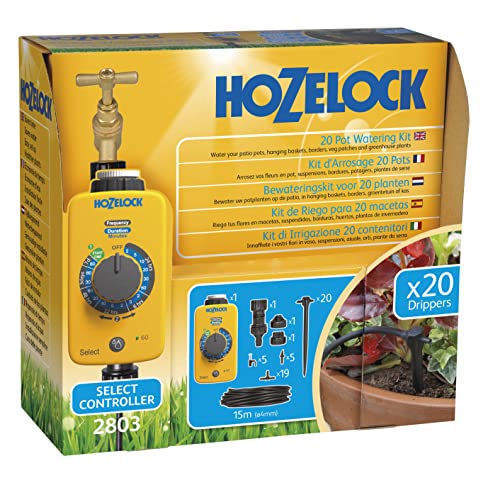
The Hozelock 20 Pot Automatic Watering system comes with the AC1 Timer included and will keep the plants in your pots, containers, greenhouse and vegetable beds well watered. This watering system allows you to water up to 20 pots and hanging baskets at a time but it doesn’t have adjustable drippers like my previous Hozelock easy drip system I just covered. If most of your plants are in containers, perhaps on a balcony or in a small garden, you can automatically water them all at once.
This watering system has a 15-meter micro tubing providing a good reach to quite a few containers. The hose is 4mm wide inside so it should work with most water pressures. Included in the setup, you also get a pressure reducer and two tap adapters. The dripping rate is 4 litres per hour, so much lower than the adjustable alternative I reviewed. You will probably need to water your plants for between 30 and 60 minutes. This should water your pots and containers adequately, however, it also depends on the size of your pots as well as the water retention in the compost. Again not being adjustable, you can’t adjust the amount of water you give each pot, they all get the same amount whether they need it or not
Cut the flexible hose to the length to fit your arrangement of plant containers. The hose carries water out to the drippers you have set along it (at your chosen positions) which are also super easy to attach. Twenty pressure-compensating drippers come with this irrigation system. If your water pressure is low, you may need to put two drippers in each pot or simply water for a little longer. You can also try removing the water pressure reducer. Just something to bear in mind.
The AC1 Timer with the Hozelock 20 Pot Automatic Watering System runs on two ‘C’ type batteries. Personally, I don’t think these timers are great; they will work fine, but the durability is questionable, and they usually only last a season or two.
However, for occasional use, the included electronic timer offers a range of timing options for watering from once a week to four times per day. If you want to water your plant pots immediately, you can use the manual button to override (but not delete) the programming. This timer is fairly basic, more of an entry-level model but it does the job of getting you up and running, but you may want to consider an upgrade in the future.
Pros
- Waters hanging baskets, patio pots, greenhouse plants and vegetable gardens, basically anything in pots.
- Set up this kit in minutes and water your plants straight away.
- Hose (15m by 4mm) is flexible so you can cut it to suit your arrangement of pots and containers.
- The timer is powered by two ‘C’ type batteries (not included) so you don’t need to connect anything to the mains.
- Waters up to 20 pots and baskets at one time so you needn’t go from one to another to check whether the soil is dry.
- The timer is electronic and provides a variety of watering periods to suit all your plants.
- Drip watering ensures that the water reaches the roots of your plants where it’s needed.
- Add-on components make this system suitable for large areas such as your lawn.
Cons
- Set-up instructions could be better.
Our recommendation
The Hozelock 20 Pot Automatic Watering system (with the included AC1 Timer) lets you water 20 plant pots, containers or hanging baskets etc, at any one time and is a good affordable option for maybe using short term.
Set the automatic timer for the days you want the plants to be watered, sit back and relax. You can add more hoses to the 15m hose if your plants are spaced across your patio or garden. Adding extra components also makes this system suitable for large areas such as lawns.
I’ve made the Hozelock 20 Pot Automatic Watering system with its AC1 Timer a good choice to get started or water whilst you’re on holiday. It’s not something I would now install, but at the end of the day, it does serve its purpose.

Read next: Best greenhouse watering systems
4. GARDENA Starter Set Flower Pots M: The Micro-Drip System Starter Set for seven potted plants and three plant troughs
Buy on Amazon.co.uk

The GARDENA Starter Set Flower Pots M: The Micro-Drip System Starter Set straddles two growing situations: growing plants in pots and in troughs. If you have a variety of containers in which you grow your plants and herbs, this Gardena system delivers just the right amount of water to each.
This micro-drip system starter kit waters seven pots and three troughs (rectangular planters). It does this through seven adjustable endline drip heads and nine inline drip heads. Put each of the endline drips heads into each pot and put three of the inline drip heads into each planter. The endline drippers let water through at up to 10 litres per hour; the inline drippers operate at 2 litres per hour. A significant feature of this GARDENA watering system is that you can adjust the flow of water through each dripper. Set each dripper to the watering requirements of the plant in specific containers, even if they’re all different. This system is more much premium than the cheaper Hozelock and similar alternatives.
The flexi pipe is 15 meters long (that’s standard) but it’s 13mm in diameter. This is wider than most other hoses and so it lets more water through at any given time.
The timer is included in this starter set and is of much better quality than the one included with Hozelock. It lets you plan several watering sessions and has a bunch of features. Water your plants frequently in the height of summer and less often in the autumn. Drip irrigation is not the only method of watering that this irrigation system provides. Buy extra components for spray, soak and micro-misting watering sessions.
Pros
- Waters seven pots and three troughs/ ectangular planters to handle your variety of plants.
- Easy to install using patented “Quick and Easy” connection technology so you can be up and running in no time at all.
- The flexi pipe is 15m long and 13mm wide, which is wider than some of the other automatic watering systems.
- Configuration can be changed easily and additions added with no hassle.
- Water quantity delivered can be adjusted for plants to give each of them the optimal amount.
- Easy control timer (included) and you can plan several watering sessions per day.
- Runs on a standard nine-volt battery that are easy to find.
- Extras include sprayers, micro-misters and other garden watering equipment.
Our recommendation
The GARDENA Starter Set Flower Pots M: The Micro-Drip System Starter Set is one of the most versatile of the products in this review. This system gives you the option to grow your various plants in different sized containers and to water them all automatically at the same time.
It also provides the most methods of watering, so you can change drop drip to spray, micro-mist, or soak depending on the plants’ conditions. The timer is simple to use and lets you tend to your plants several times a day.
If you have a variety of plants in a variety of containers of different sizes (perhaps in a city garden or on a balcony), the GARDENA Starter Set Flower Pots M: The Micro-Drip System Starter Kit is a great way to start your irrigation system.

5. Orbit 96781 ‘Buddy HF’ Single-Port Digital Tap Timer
Buy on Amazon.co.uk
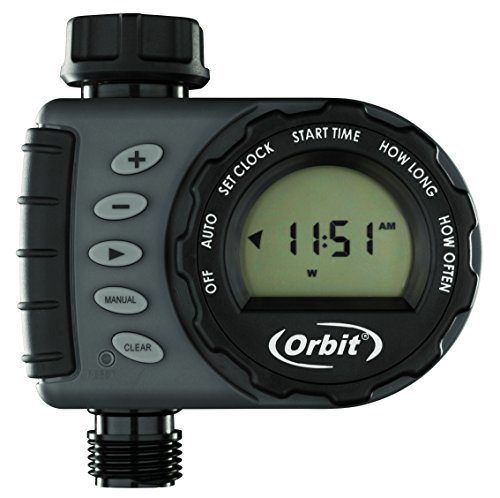
If you need to buy a timer for your drip irrigation watering system, the Orbit range of timers is a good choice. The Orbit 96781 ‘Buddy HF’ Single-Port Digital Tap Timer is designed to make it easy to operate – and it works.
The Orbit 96781 timer is single-port, which means that you can only attach one hose to it. It delivers a 20% increase in water flow over other timers and this is what the ‘HF’ stands for, high flow. Two AA batteries power this timer and the manufacturer says that they will last for over 84,000 on/off cycles.
Programming this timer is easy. The clear functions on the dial and the large LCD screen are straightforward to use. Your basic watering choices are for the start time, duration of watering and the frequency of watering. Watering frequencies include days of the week or intervals of a number of hours. The watering duration ranges from 1 minute to 360 minutes. While six hours may seem a long time to be watering anything, it’s better to water deeply and less often than shallowly and frequently.
Online reviewers had reported that this Orbit timer is noisy to use. A solution presented by a seller was to remove the small mesh dome filter from the top of the unit, turn it upside down and put it back in. This should reduce the noise because you obviously don’t want to remove the filter.
A useful feature of this timer is the rain delay function. This saves you from wasting water watering when it’s raining. That’s less on your water bill to worry about. If you need to water your plants right now, use the manual watering function on the unit. This doesn’t overwrite the programming but just overrides it for the manual watering period. And the programming also stays there when you change the battery.
Pros
- High Flow timer produces a 20% increase in water flow rate over competitive brands of timers.
- The LCD display is digital with an oversized dial so everything is easy to see at a glance.
- The timer has easy to understand instructions on the dial and buttons on the body that makes it simple to operate.
- Watering time selections include days of the week or intervals (e.g. every 6 hours) for flexible watering schedules.
- Choose to water for periods of one minute to six hours depending on the weather and the requirements of your plants.
- Rain delay feature is from one day to seven days so you don’t waste water by using your irrigation system in the rain.
- Override, but not overwrite, the programming to manually turn your irrigation system on immediately.
- Water-resistant construction makes it safe to leave the timer out in all weathers.
Cons
- Needs two AA batteries, we recommend buying branded Duracell batteries.
Our recommendation
The Orbit 96781 ‘Buddy HF’ Single-Port Digital Tap Timer has all the features that you need to plan an optimal schedule for your watering system. The oversized screen and the easy to figure out functions on the dial make it straightforward to program. You can even set your watering system to come on several times a day in hot weather. Choose from the days of the week you want to water your garden or from a selection of hourly intervals.
Consider this Orbit timer if you have a watering system that uses only one hose, perhaps a small system setup. It’s also a good choice for those who want to set complicated watering schedules. We highly recommend Orbit timers because they are a premium brand made from quality materials.

Watering System Buyer’s Guide
You may come across other terms for automatic watering systems, such as garden watering systems or micro irrigation systems. All these terms generally refer to the same thing – a way to automatically water your plants, vegetables and trees. The customisable systems water the base of your plants and not the surrounding soil.
In our search for the best automatic watering systems, we focused on finding the best irrigation drip system. This is a series of hoses and drippers that take water from your outside tap to wherever you lay them and automatically and gently release the water in drips. However, one of our selections also comes with attachments for additional watering methods.
In this Buyer’s Guide, we discuss the main features of the best automatic garden irrigation systems so that you can make an informed choice when purchasing one.
Kits or components
Your first choice is whether you want to buy a ready-made complete watering system in a kit or make one yourself from components using the DIY route.
The advantage of these kits is that all the components you need to install a complete working system come in a box ready for you. However, some kits don’t include a timer so check whether this will be an extra expense if you don’t want to turn the tap on manually or if you aren’t around to do it, for example, if you were on holiday.
Building an automatic watering system from scratch means that you can get exactly the system you need by putting a variety of components together. However, some of the watering systems we reviewed allow you to add a selection of components to extend your first system. One watering system in this review even permits you to add on parts from other brands’ garden watering systems, which is extremely handy if you already have a system in place.
Setting up
Most manufacturers state that it’s easy to set up their irrigation watering systems, and it is if the tap adapters are included with your purchase for your outside tap. What takes a bit of thought and experimentation is the pressure that the water should be to go fully through the hose(s).
Some watering systems come with a pressure control to make sure of the correct pressure. For these systems that let you adjust the flow of water through the drippers, you need to adjust each dripper to the correct opening. It is definitely worth it to be able to deliver different amounts of water to plants with different requirements rather than one type of flower rate for all plants.
If the borders or pots you plan to water are away from the faucet, attach a regular (but high-quality) garden hose to the tap and the other end to the watering hose. You won’t waste water but it will drip over your patio or path.
Watering
Drip irrigation is one way to deliver water to plants in an efficient way. Spraying the plants from a close distance or using a soaker hose are alternatives. The drip method, however, is the one that ensures the water is delivered only to the plant’s roots and not sprayed around the area or soaked into the soil between your plants.
The perforations in the automatic watering system hose are usually placed at regular intervals. This does restrict you somewhat in how you arrange the hoses to cover all your borders or pots. Some models of garden watering systems allow you to add on sprinklers so that the water reaches a larger area such as a lawn. Check if it’s possible to add more than one sprinkler at a time for the most water coverage for your grass.
Use the drip watering systems at regular intervals and leave them on long enough to deeply water your plants. Watering deeply and less frequently is better for the plant’s health than watering shallowly and often.
Water timers
The key to the success of a fully automatic garden watering system is the timer. If you don’t want the hassle of remembering when to water your plants or you’re going away from home and your neighbour doesn’t want to look after them, a timer is essential.
Not all timers are the same. Although their features may be similar, how you operate them and how they work is often different.

Features to look out for include:
Watering periods: the best automatic drip irrigation systems have timers that let you set all elements of a watering period.
The day of the week you want to water the plants on; choose one or multiple days.
The time you want the watering to start; some timers handle three different watering sessions a day while others give you a choice of times.
The duration of the watering period; the widest duration times range from 1 minute to 240 minutes or 360 minutes.
Some timers are manual timers and others can be programmed from your tablet or smartphone using wi-fi or Bluetooth.
Batteries – timers power sources range from a C battery to two AA batteries; most timers use standard alkaline batteries and not rechargeable ones. Be prepared to pay for brand new batteries because timers don’t operate efficiently on ones that have been used before.
Water now – most timers have a function that allows you to override their programming and turn the watering system on immediately. Don’t worry, this does not overwrite the programming; it will be still there when you turn the manual watering off.
Final Conclusion

Don’t think of using an automatic watering system as an easy way out of watering your plants; think of it as ensuring that they receive the amount of water they need when they need it. Their health depends on that.
The best automatic drip irrigation systems reviewed here are easy to install, simple to use and save you time and money (on your water bill and in replacing your dried-out plants). A key factor in successfully using a garden irrigation system is the water pressure through your outside tap. It needs to be high enough to go through the hose smoothly, so make sure you test the pressure as it can sometimes be better to have a water diverter and separate your watering system into 2 or 3 separate watering system to maintain pressure
Need more information on how to set up an automatic water system? Check out our guide here.
We also have a guide on how to set up a water drip system – read now
Last update on 2026-07-12 / Affiliate links / Images from Amazon Product Advertising API
