
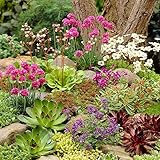
If you are looking to create and build an alpine rockery garden, it’s all about getting the right rocks and stones to offset the alpines to your advantage, and most importantly having well-drained soil. This can mean adding plenty of horticultural grit into the soil to improve drainage.
You can use a rock garden to give sun-loving plants access to the bright sun, with shade-tolerant plants nestled in a corner where the sun doesn’t reach as often. There is a lot of flexibility here. Moreover, with alpines, you have so many options. Originating from high altitude areas, higher than the tree line, these rock plants really embrace the cold. They won’t grow too tall, but you can gather a lot of them in one place and design a stunning rock garden.
What’s more, you don’t need a large space to do it. Smaller spaces are perfectly suitable because the key features are often dry stone walls or troughs, inside of which are containers of alpines. The alpines in question don’t get very big, most hovering around 10-15cm.
Check out our top 10 alpines for planting in a rockery garden here

When to build your alpine rockery garden
A good time to construct the features is in the winter or autumn, especially because there is a lot less to do in your space otherwise, fewer plants in the way you need to be careful of, etc.
Spring is when you want to put the plants in and adding extra plants through summer will also work well. They ideally need time to establish themselves in their new space before the main part of the growing season begins, which is why planting in spring is perfect, plus garden centres and nurseries usually have the biggest selection of rockery plants in spring.

I have recently put together a step by step guide on how to create an alpine rockery planter here
Plan ahead when creating a rockery
It is important to plan ahead when you create and build the rockery so that you don’t have to go back and move heavy rocks or reposition pots. To that end, if you follow these steps you can make sure that does not happen.
Step 1: Choose the Site
When you are ready, it’s time to choose a site. The site can be a small corner of your garden or your entire garden, depending on your microclimate.
Your goal should be to find an area that is most open, far from overhead trees or large tree roots, where your plants will get sun for the majority of the day. Remember, these are alpines that tolerate cold and wind, but they are still growing naturally above the treeline with direct access to the sun.
The more sun the better
It is important that you find a spot with access to the sun, even if only a few hours, over a spot with only shade all day.
Well-drained soil is a must
The position you choose should also be one with good drainage and this is probably the most important thing to consider. You can, of course, take the time to enhance your garden using raised beds but it’s simpler to focus on a naturally well-draining area or containers that are built into the area. One final point to consider is to always avoid a frost pocket if you can.
Step 2: Prepare the Site
Add drains if necessary and dig plenty of grit into the soil
Once you have found the site, it is time to prepare it based on the gradient, any necessary pipework underground, and how you plan to view it. You might want to consider taking some time to do a few sketches at this point, to really get a feel for what options you have. The important thing here is to insert drains to improve drainage if needed and add plenty of horticultural grit into the soil to further improve drainage. If you’re lucky you already have good-draining soil and simply digging in a little extra grit is all you need to do

Step 3: Gather materials
Time to get your rockery stone pieces
Now is the time to get the materials. These are hard and heavy, and an investment. The materials you need are often rock, slate, or gravel. It is good to take a look around your local area to see what’s common, then find local stones if you can. Local stone goes a long way towards making your rockery look normal, blending in with the surroundings, and it will probably be easier to find. You can purchase salvaged stones or second-hand stones if possible. Garden centres and nurseries also usually sell rockery stones in different sizes and this is usually a good place to start.
Recommended stones:
- Sandstone is not too alkaline or hard and is widely available.
- Limestone is equally popular but they are more alkaline.
No products found.

Step 4: Construct the rockery
This construction phase might seem daunting, and it could prove useful to engage the assistance of a local landscaper to help, depending on the size and scope of your project. The instructions below assume you going all out and not just digging some grit into the soil and then laying rockery stone on top for planting. You can, of course, try this but you will have a more natural rockery if you follow the steps below:
- Start by marking out the area so you know where your rockery will be, a good way to do this is to get a bag of sand and pour it using a bottle.
- Remove any weeds by hand or use a weedkiller if necessary.
- Build your base out of stone, broken bricks, or other coarse rubble 15cm deep. This will form the base of the whole rockery that will later be covered with a layer of soil.
- Cover the rocks with a polythene sheet with holes every 10cm so that it doesn’t mix with your compost.
- Select bigger stones as your main stones and put them in place first.
- Then spread out the remaining stones around the keystones.
- Use a shovel or spade to make hollows in the ground into which the stones sit, for varying heights.
- Use things like small bricks and smaller stones to help add layers.
- Remember, the rockery should seem natural, not man-made, so you can do things like tilt the rocks backwards to achieve a good effect.
- Finally, add weed-free topsoil under and between the stones. The stones should be buried in place about one-third of their total size, deep. The best soil for this is a John Innes potting compost, however, this can be expensive so at a push, you can use normal topsoil.
- Around the stones, you want pockets of quality compost, where the plants will be planted.
Step 5: Planting rockery plants
Now it is time to put in the plants. These can be directly in the ground or in pots, put in the pockets around the stones. Note that if you plan to use containers, you need to leave pockets big enough to accommodate them.
The area for the plants needs to give them adequate drainage, access to sunlight and allow space for them to spread out as they grow.
If you are planting directly from another container, remove the plants carefully. Gently tease out the roots and remove any weeds. Then plant them firmly in your compost mix.
Recommended Alpines
Now that you have things set up, it’s time to find the right alpines. There are many from which to choose, but below are a handful of top options:
- Dianthus ‘Popstar’ – bright pink, toothed flowers, subtly scented.
- Lewisia longipetala ‘Little Plum’ – pink and apricot coloured, star-shaped flower clusters.
- Lithodora diffusa ‘Heavenly Blue’ – bright blue flowers on top of evergreen foliage.
- Phlox subulata ‘McDaniel’s Cushion’ – bright, magenta flowers that need a sunny spot.
- Saxifraga ‘Winifred Bevington’ – pink flowers on a red stem with evergreen foliage.
- Sedum spathulifolium purpureum – purple-tinged leaves with golden flowers.
- Sempervivum – many varieties available, with green foliage.
- Thymus ‘Silver Posie’ – a variety of Thyme that grows upwards and has variegated leaves.
- Veronica prostrata – a spreading plant, with blue flowers.
See our detailed article on 10 of the best rockery plants for making a rockery
Learn how to grow rockery plants from seed
Potential Problems
There are some potential problems you need to be aware of. These include:
- Ants: these can be problematic in the soil and are best treated with an ant killer if needed.
- Aphids: these can damage the plants (as with most plants) and these are best sprayed with a bug killer if they become a problem.
- Birds: these can pull the rosettes apart, providing nest boxes and bird food can help distract them from doing this.
- Slugs and snails: these can damage the soft growth, products like slug pellets will work well, however, we prefer to use more environmentally friendly controls such as slug catches that you fill with beer.
- Vine Weevils: these can damage roots.
Best selling rockery plants

- 9 x Rockery Plants - Perennial garden ready flowers in 10.5cm plant pot , Hardy Outdoor ground cover & trailing plants year round
- LOW MAINTENANCE- Rockery perennials are easy to care for once established, saving time and effort in the garden.
- EROSION CONTROL- Their deep root systems help prevent soil erosion on slopes and uneven terrain.
- LONGEVITY- Perennial plants return year after year, providing a lasting and cost-effective garden design.
- VARIETY OF COLOURS AND TEXTURES- Rockery perennials offer a diverse range of colours, shapes, and textures
- Pot Size: 9cm.
- Supplied Height (Inc. Pot): 20–30cm.
- Characteristics: The selection of perennials have evergreen foliage and are extremely hardy plants.
- Flourishing Season: Colourful flowering through the Summer months, mid-May to mid-September.
- Water & Maintenance: The collection of plants require little water. Make sure to plant in retentive, well-drained soil in full sun. Drought tolerant over extended periods.
- A hand picked mix of 6 evergreen hardy alpine and rockery plants: This unique mix features robust outdoor plants, perfect for creating stunning garden displays with evergreen rockery plants and vibrant alpine plant varieties.
- Ideal for rockeries, gravel gardens, troughs or walls: Designed specifically for practical use, these outdoor plants can enhance any space, making them ideal for rockery plants, gravel gardens, and decorative troughs.
- Compact, low growing varieties: Our alpine plant mix offers an array of succulent plants that thrive in small spaces, delivering both a visually appealing and functional outdoor garden experience.
- Drought tolerant and easy care: These evergreen plants outdoor are perfect for busy gardeners, as they require minimal maintenance, primarily enjoying dry conditions with excellent drought-tolerant outdoor plants features.
- Seasonal interest with long lasting flowers: Enjoy year-round beauty with hardy outdoor perennials from our selection, as they bring seasonal interest with their colourful flowers and resilient evergreen foliage.

- DIVERSE PLANT COLLECTION: Our alpine plant collection includes six different alpine plants, each with unique colours and patterns, adding dynamic beauty to your garden. These rockery plants bring a stunning variety of textures and shades, enhancing the natural beauty of your garden.
- ATTRACTIVE BLOOMS: These outdoor garden plants produce vibrant flowers from late spring to summer, adding stunning colour to your garden throughout the summer. The bright blooms of these garden plants attract bees, contributing to the biodiversity of your garden.
- GROWTH AND SPREAD: Our potted outdoor plants arrive at a height of 20–30 cm, including the 9 cm pot, making them perfect for hassle-free immediate planting. As they mature, these border plants enhance the natural beauty of your surroundings, creating an inviting and vibrant atmosphere.
- CAREFULLY GROWN: Our garden-ready perennial plants are grown with the utmost care to ensure they arrive at your doorstep healthy and ready to thrive. With proper care, these evergreen shrubs will grow vigorously and can become a long-lasting part of your garden.
- PLANTING INSTRUCTION: For optimal growth, plant these flowering shrubs in well-drained soil, positioned in full sun. These bedding plants require minimal watering and are low maintenance, making them an excellent choice for both novice and busy gardeners.

- 20 Different Alpine Rockery Plants in 9cm POTS ~ Quality Alpines Direct from Specialist Grower in West Pinchbeck, Lincolnshire
- You will receive 20 DIFFERENT Alpine Plants in 9cm Pots - Carefully selected by us to provide a good mix of foliage and flowers from early Spring to Autumn.
- Photos show examples of previously despatched Alpine Collections at various times of the year. As growers, we supply spring, summer, autumn and winter. All sent with The Alpine and Grass Nursery's Plant Passport.
- Our family have been growing alpines for over 35 years, first in North Yorkshire and now in Lincolnshire. Beautiful rockery plants sent fresh to your door from us, the grower. Add a Greeting to the box for Free, Eg Happy Birthday Dad!
Image credits – Shutterstock.com
Last update on 2026-07-10 / Affiliate links / Images from Amazon Product Advertising API
