Keeping your garden and lawn watered all summer long can be time-consuming and water consuming. One of the main benefits associated with a water drip system or other automatic watering system is that you can conserve water with micro-irrigation. A water drip system uses a collection of tubes and sprayers to deliver water directly to the base of your plant when and where they need it without any water being spilled or evaporated in the heat.
The best part is you don’t need a lot of fancy components to make your own water drip system. You can set one with a smallish budget and a few hours of investment. What’s more, you have the freedom to design a drip system that gives your trees, flower beds, shrubs, even hanging baskets and planters exactly what they need, which can be truly beneficial if you only have one outdoor tap and have to strain yourself to get water from one end of your garden to the other. It also saves water by reducing waste and you can even set them to water while you’re on holiday.
Designing your drip system layout
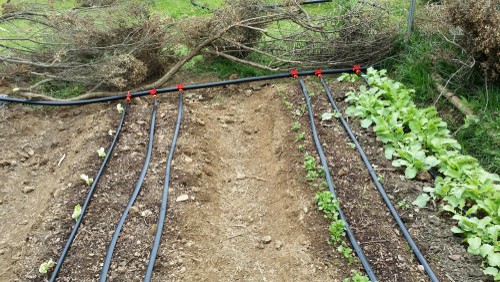
When you set out to install your drip irrigation system, you have two types of tubing the first of which is usually 13mm and the second of which is 4 mm which usually have the drippers on and is flexible. These hoses are fitted with emitters out of which water drips at a regulated time ad at certain rates depending on the drippers you choose. You can move the tubing in and around other plants in borders, containers, pots, planter boxes, or trees so that water gets at the roots and waste is reduced.
When you go to a garden centre, nursery or look online you can buy tubing that is already punctured with emitters or you can punch the holes yourself at the intervals you require and attach the emitters yourself which is a very easy process. With an unperforated set of tubing, you can customize the system if your garden has an unusual layout. This is also suitable for when you simply want to connect sections of tubing around a large obstacle in your garden that doesn’t require water.
For example, you might have a large space with two or three primary gardening spots in between which are benches or small garden tables and with the unperforated tubing you can run it around those obstacles, bury the tubing with some mulch or decorative bark, and then attach the perforated tubing with the emitters when you come upon the next garden area you want to set up a drip system.
Choosing Accessories
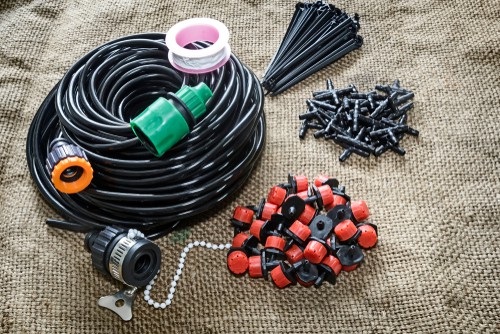
You will find a lot of accessories such as foggers which are designed for any hanging containers, or large sprayers if you want to maximize the ground cover area to which your water drips. Map out the configuration you need any accessories you want before you head to the garden centre or start ordering online. In some situations, especially for smaller gardens without any obstacles, you can buy a drip kit that has everything you need you to get started.
Recommended drip system kits
![HOZELOCK - Universal Irrigation Kit : Ideal for Watering Borders, Flowerbeds and Vegetable Gardens, Easydrip Universal Drippers/sprinklers, Supplied with 15m of Ø 13mm Hose [7023 0000]](https://m.media-amazon.com/images/I/51FcorBqHBL._SL160_.jpg)
- Easily water your borders, hedges and vegetable gardens saving you time, effort and water
- A select number of components ensure easy setup
- Combine with any water controller for Automatic Watering
No products found.
No products found.
Installing a drip system
Step 1
When you are ready and you have all the components the first step is to connect your tubing to an outdoor faucet. You should be able to screw the vacuum breaker directly to a pressure regulator. A pressure regulator is important, if you have too much pressure coming out of your hose it can loosen all of the components and break up the efficiency of your drip system. Attach your filter to the pressure regulator and screw everything together.
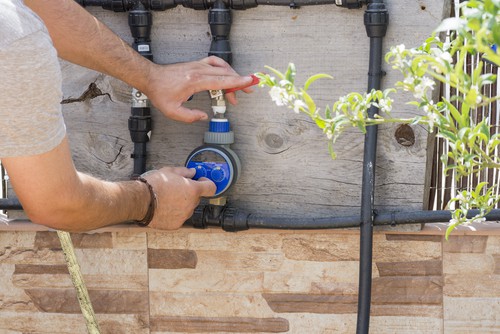
Note: If you plan to have a water timer so that your drip system is done automatically, you will need to install this on the tap directly.
See our top recommended water timers in this review
Step 2
At this point, you should attach a length of unperforated tubing from the tap area to your first planter bed. You can snake the tubing that has the emitters around your plants and place them near the base of the plant so that the water reaches the roots. All of your lines should be kept about 30 centimetres apart from one another but you can lay them out as your design necessitates.
Step 3
Once everything is in place you can use plastic ground stakes that have hooks on top and are made of plastic, a fixed directly over the tubing, and can be pushed downward into the ground to hold the tubing in place where you want it. Once you reach the end of your tubing requirements, you can cut the end of it and use a plastic cover to serve as an end cap. 13mm thick tubing is best for bringing water directly from your source to the areas in question but the formula meter tubing is what you want specifically over your plants.
Step 4
There are different emitters from which to choose such as foggers, specialized drip heads, single emitters for things like rose bushes, and you can choose the style that best suits the design of your garden.
Again when all is said and done you can cover any tubing that is not directly connected to the emitter with mulch or bark so that it blends seamlessly into your garden.
Related articles
How to keep your plants watered while on holiday
How often should you water your plants explained
The best times to water your garden in winter
Image credits – Shutterstock.com
Last update on 2026-07-30 / Affiliate links / Images from Amazon Product Advertising API