Fritillaria is a spring flowering bulb that produces bell-shaped flowers. These flowers will add interest to your garden when not much else is flowering, ranging from bold flowers that demand all the attention, down to the more discreet and delicate flowers that are unaware of their own beauty.
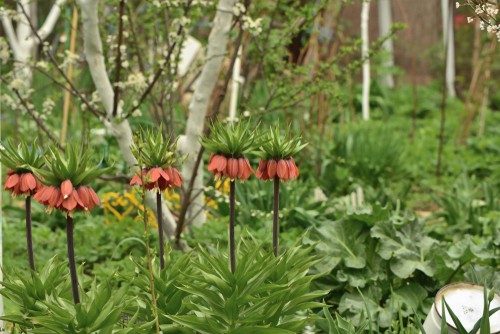
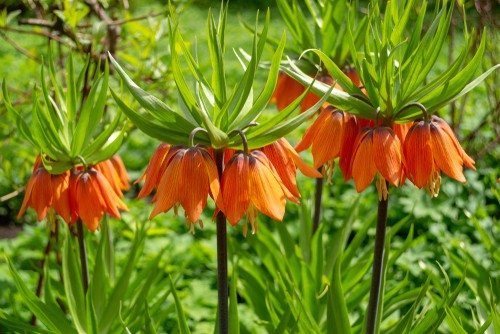
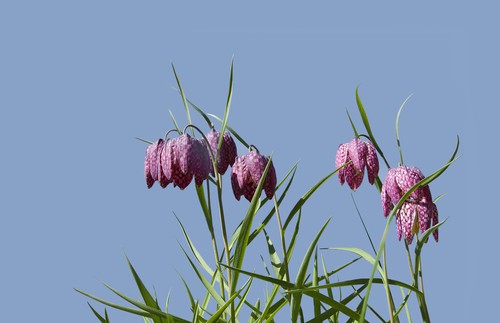
Some of the varieties originated in British meadows, made up of mostly the smaller delicate varieties commonly known as snakeheads while others come from Eastern Europe, one example is the Fritillaria imperialism which can get as tall as 5ft and look incredibly exotic.
Most Fritillaria will grow very well in the UK because we have a similar climate and ground conditions, e.g. moist well-drained soil.
Where to Plant Fritillaria
If you have decided that Fritillaria are something you want to grow in your garden, before you plant them you will first need to decide (and find a location) where you will grow them. Fritillaria do best when they are in well-drained soil with access to bright sunshine, or alternatively in moisture retentive soil in partially shaded spots. The level of sunlight your Fritillarias will receive is one of the main factors you need to consider when planting, regardless of the variety you choose.
For example, the larger Fritillaria imperialism needs full sun while the smaller Fritillaria meleagris will grow in full sun but also in partial shade too. With this in mind, you need to check what amount of sunlight the Fritillarias you are planting need.
Plant bulbs from September to October
Once you have decided upon the variety of Fritillaria and the location you are going to plant them, it’s actually time to start planting. The bulbs should be planted directly in the ground in September or October. This time of year is also usually when you start to see them for sale in garden centres and nurseries.
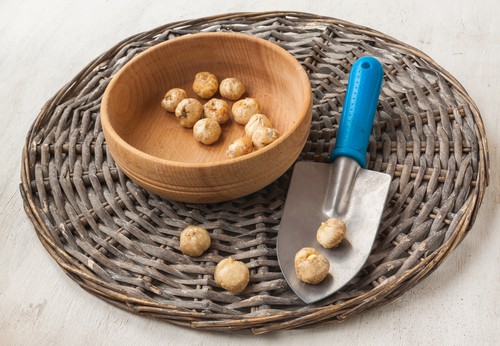
Plant the bulbs at least 4 times their own depth
If you choose to grow one of the larger bulbs (which are pretty impressive in size) they should be planted deeply, around 30cm below the surface. As a general rule for all Fritillarias, you need to plant them around 4 times the depth of the bulb. This is important to get them to flower successfully, one of the main reasons they don’t flower is that they were planted too shallow.

You can also buy the smaller varieties already growing in pots, these are often sold amongst perennials and rockery plants. These can be planted as soon as you buy them, to the depth they are in the pot.
Regular Care
After you have planted your Fritillarias and they have finished flowering, you need to allow the foliage to die down completely before cutting them back.
Mulching and feeding
For the larger varieties that demand all your attention (but are well worth the extra effort) you should add a layer of mulch around the base of the plant in spring, as soon as you see the first shoots pushing their way out of the ground. Give them a feed of tomato fertiliser once a fortnight until they start to flower.
Propagating
Sowing seeds
You can choose to propagate using Fritillaria that are growing happily in your garden in one of two ways. The first is to propagate them by seed, however, this method can take around two years from germinating to planting out, so it requires a lot of patience.
This requires you to sow the seeds under glass in autumn until they have germinated, then you can then prick them out into small single pots. After this point, you need to allow the seedlings to continue growing for 2 years, sometimes moving them into pots that are just slightly larger, continuing this process before you permanently plant them in your garden when they are big enough.
Dividing clumps at the end of summer
The second method is to wait until a mature plant is in need of division, which is usually every 3-4 years, however, these timings are not usually essential. You can divide clumps at the end of summer by simply pulling them out of the ground and splitting them. You are then able to add the newly split bulbils into containers or the ground.
Pests and Problems
Fritillaria are relatively free from any problems, with a couple of exceptions. They are a member of the Lily family and this means your biggest problem is going to be that of the Lily Beetle. These pests are starting to become in the UK.
Lily beetles are bright red and as soon as you see them on your plants you need to remove them by hand.
You can learn more about Lily beetles and how to control them in this guide.
You should also take precautions against snails and slugs by using a slug barrier along the perimeter of your Fritillaria. Alternatively you can use beer traps that are nestled into the ground around your plants.
If you want to learn more about how to control slugs you can have a look at our guide here.