Last updated on November 28th, 2023
Our site is reader supported, this means we may earn a small commission from Amazon and other affiliates when you buy through links on our site.
There is no way around it, if you want a decent, lush green lawn it takes a lot of work and preparation and then maintenance. In this guide, I’m going to show you what I have found to be the best lawn aerators after testing several models over the last few years. Personally, I have been aerating lawns for almost 20 years, and it’s amazing that in that time, the aerating process hasn’t really changed. Don’t get me wrong, the tools have gotten better, but the basic principles are the same. You need to make holes in your lawn efficiently to allow water, air and nutrients to reach the grass root. Now you can use a garden fork, however, there are much easier ways to do this that are far much effective.
My top recommended lawn aerator picks after testing:
- Walensee Lawn Coring Aerator – My Best Pick for small lawns, which I personally use on my lawn every spring and autumn.
- Greenkey 30cm Rolling Lawn Aerator – My Runner-up which I use around once a month to keep the lawn in good shape.
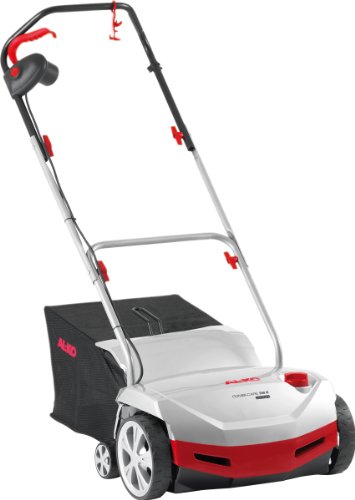
- AL-KO Comfort 38E Combi-Care 2 in 1 Scarifier/Aerator – BEST ELECTRIC AERATOR for medium to larger gardens.
- Yaheetech Heavy Duty Garden Lawn Aerator
- ZDTech Lawn Aerator Shoes
- Garland Heavy Duty Hollow Tine Lawn Aerator
What does aerating your lawn actually do?
The first thing you need to take into account is whether your lawn needs aerating. If you have never aerated your lawn before then it is most definitely yes, it will need aerating.
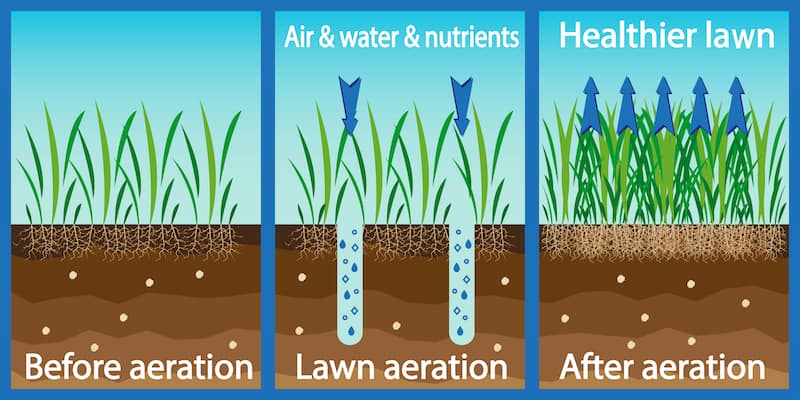
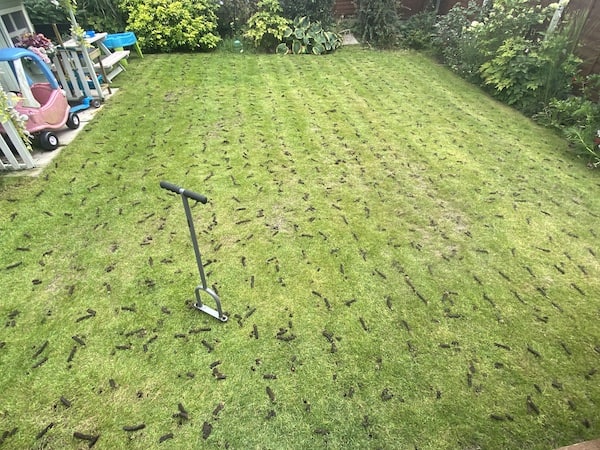
Aerating is a process that makes holes into your lawn so that water, air and important nutrients can get down into your lawn and to the roots. This promotes healthier grass blade growth and strong, deep root systems. If your lawn is very compact, maybe from foot traffic, you will often notice standing water in heavy rain. The lawn will just feel very compact and hard, and it will most certainly benefit from good aerating.
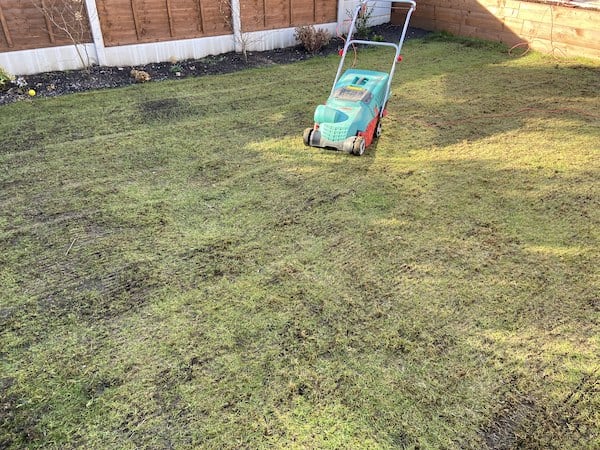
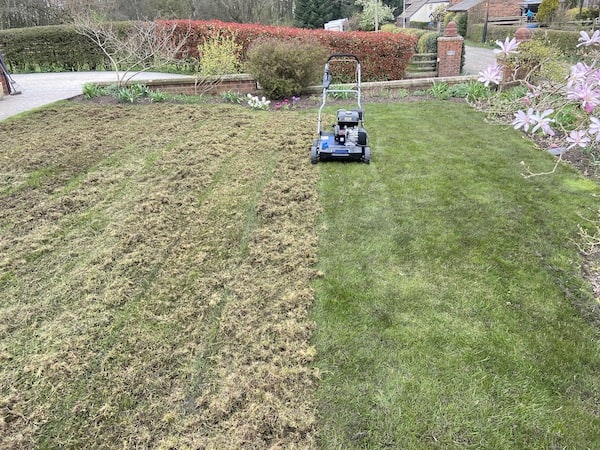
The picture below will give you an idea of what aerating does to your lawn.
BEST PICK
Runner-up

Does your lawn need scarifying, aerating or maybe both?
The first thing you need to take into consideration is if your lawn has lots of moss and thatch in it. This is easy to know as you can see it, simply rake your fingers through the grass and you’ll see moss and thatch pull out. Alternatively, you can run a grass rake over it and the moss will come out in mounds.
If this is the case, I would first recommend applying a good lawn moss killer such as iron sulphate. After this, you will need to scarify your lawn with a lawn scarifier to remove the moss and thatch, as shown in the image below. Maybe you have got more of a weed problem, if this is the case, you might just need to apply a lawn weed and feed.
If you don’t need to scarify your lawn (or have now done this) then you can now look at aerating the lawn. The first thing you need to do is cut your lawn with a mower, on the lowest setting you can get away with. The shorter the better because the easier it will be to use an aerator on and the deeper it will aerate your lawn.
Choosing an aerator type – hollow tined, spiked, manual or machine?
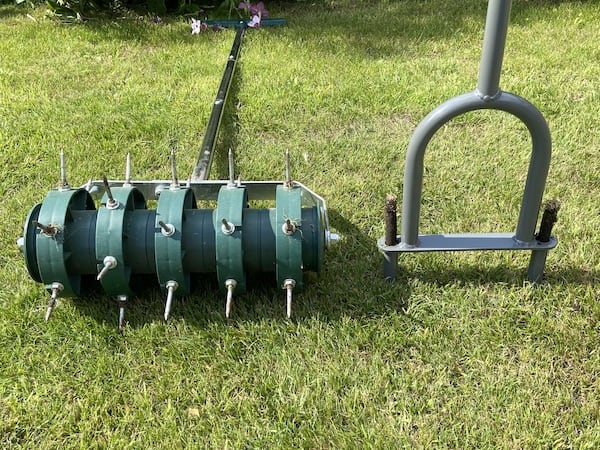
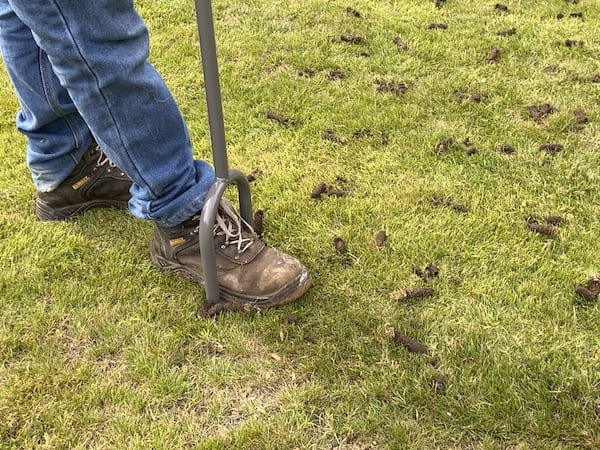
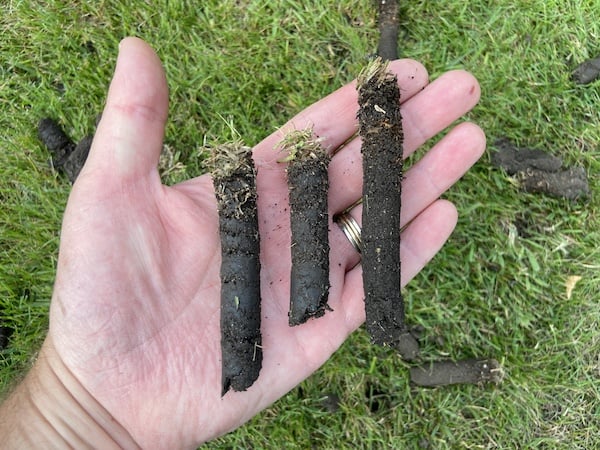
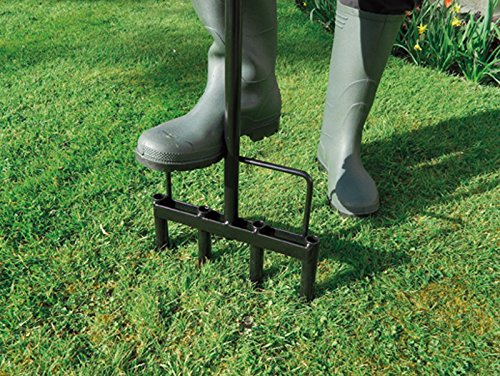
If you have never aerated your lawn, or have not for a few years, it will differently benefit from being aerated. Once you decide that your lawn needs aerating, you need to understand the different types of aerators. These include spikes and hollow tines aerators. They are simple enough to use, and the spike aerators just puncture very narrow holes, usually around 2 inches long into the lawn. Hollow tine aerators actually remove a core from the lawn which is usually much large at 4 inches deep and 3/4 inch wide. These types of manual aerators are both perfect for using on smaller lawns.
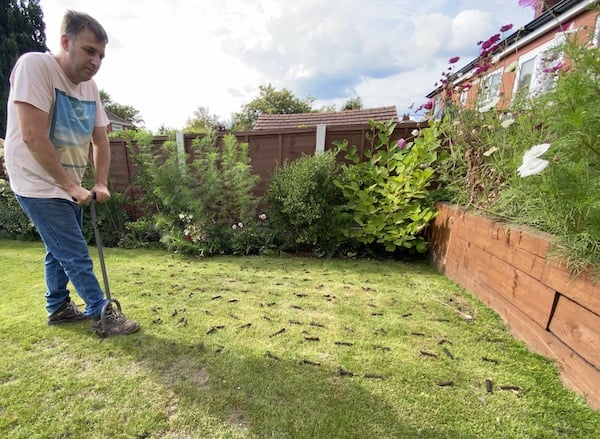
I personally prefer to use this Walensee Lawn Coring Aerator on smaller lawns as I prefer to use an aerator that actually removes cores from the lawn. I think it is much more effective, it’s what I call a proper aerator. Something to note, after using several very similar, almost identical models, including what is probably one of the best aerators, the Garland Heavy Duty Hollow Tine Lawn Aerator most other models remove four cores at the same time.
This sounds good, however, let me tell you, it can be very hard work and often impossible to push them into the ground, especially on very compact lawns. If you have got a perfect lawn, one with fine soil and a little sandy then you might get away with it.
I find the narrower core aerators with just two cores are much easier to use. I find that even though you have to press down on it twice as much (because you are removing two cores as opposed to four) it is still quicker as it is much easier to press it into the ground and removes the cores.
Here is a short video of my using it in action on a smaller lawn
If you’re thinking, what do I do with all those cores? Personally, I remove them using a rake to collect them, and you can put them in your compost bin. You can also leave them to dry and then go over them with a rotary mower to break them up over the lawn. Just don’t leave them on your lawn as it can lead to an uneven lawn with lumps and bumps.
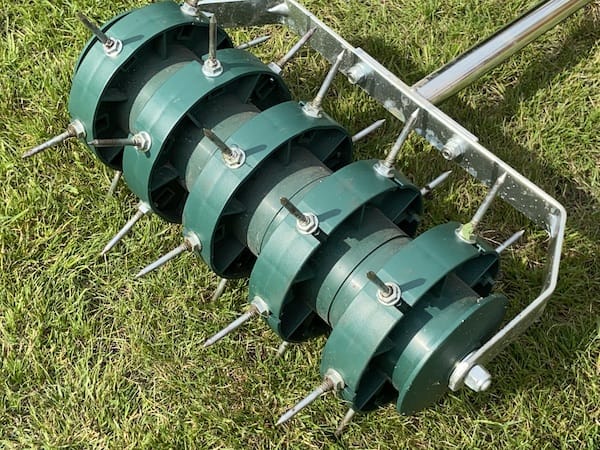
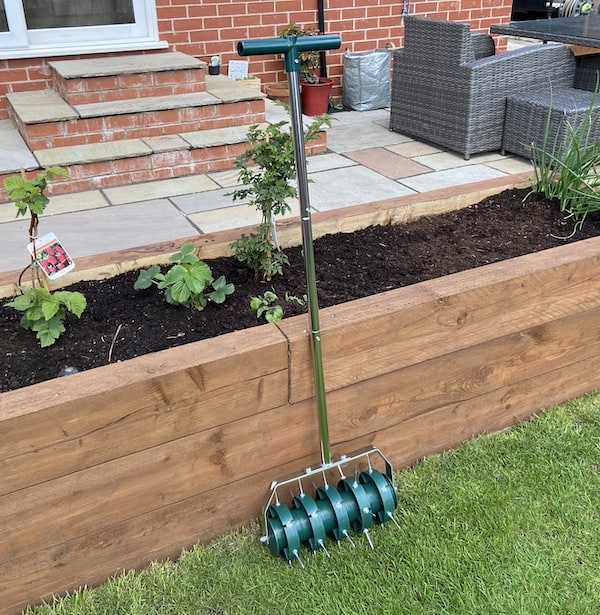
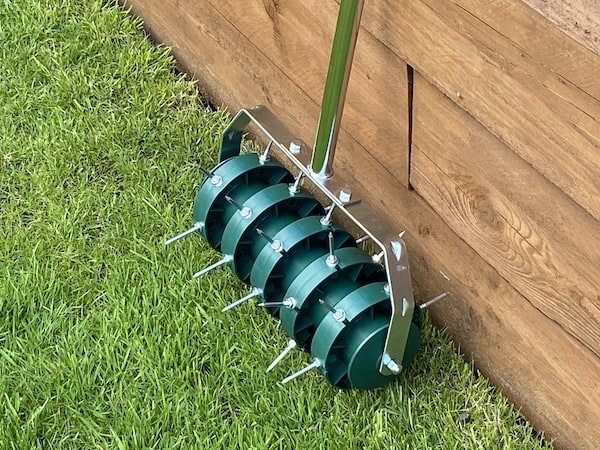
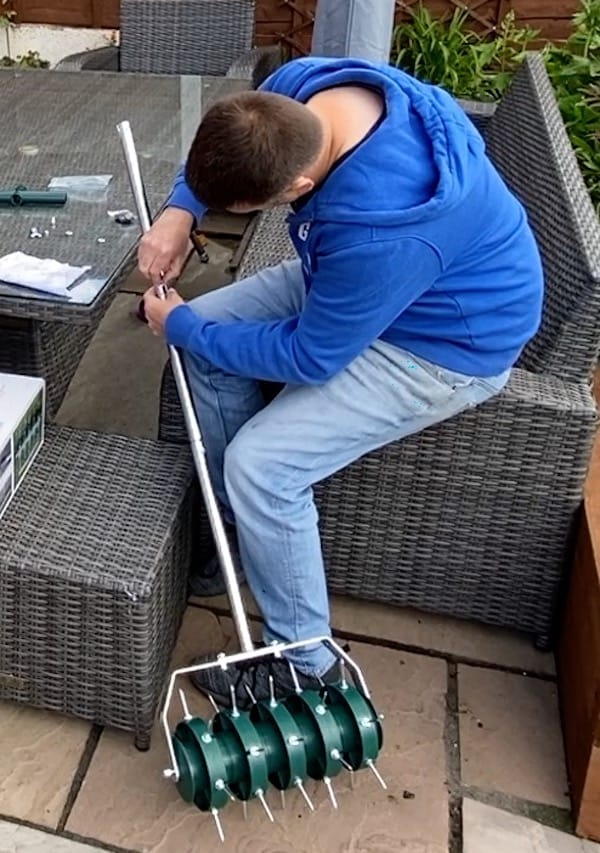
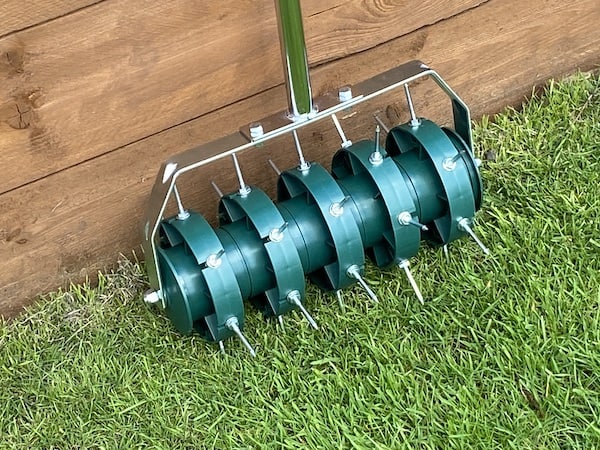
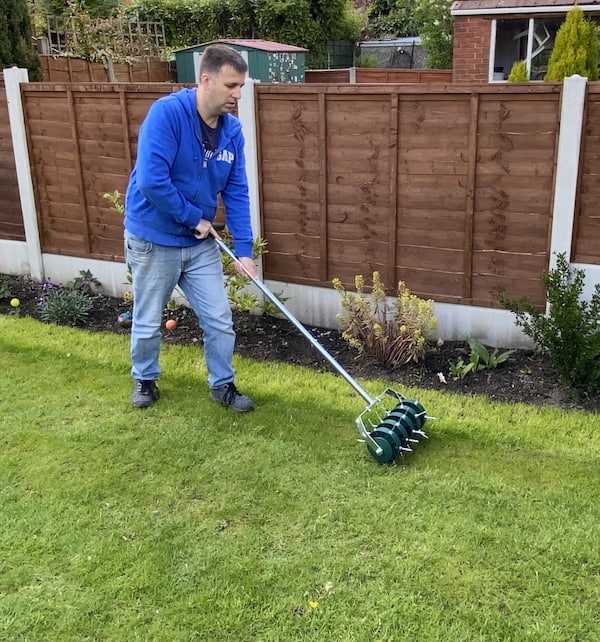
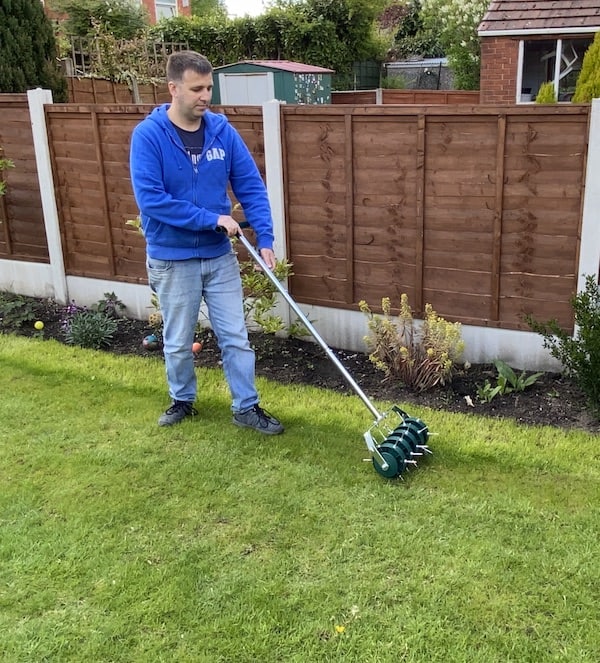
When it comes to roller aerators with spikes, my favourite model is this Greenkey 30cm Rolling Lawn Aerator, as shown in the picture below.

Using this aerator does sometimes take some elbow grease because you need to push the aerator down by having your hand on the main bar to make sure the spikes are fully penetrating into the lawn. Now, this only creates small 2-inch deep narrow holes, and I don’t think it’s as effective as the core aerators.
However, it is great for quickly rolling over the lawn a few times a year to help keep the lawn aerated but without removing cores. The hollow tine aerators I talked about previously I only really use in autumn and spring. If you have an area of lawn that has more foot traffic than the rest of the lawn, such as a greenhouse, shed or perhaps where the postman cuts across your lawn, this model can be great for aerating the soil in those areas.
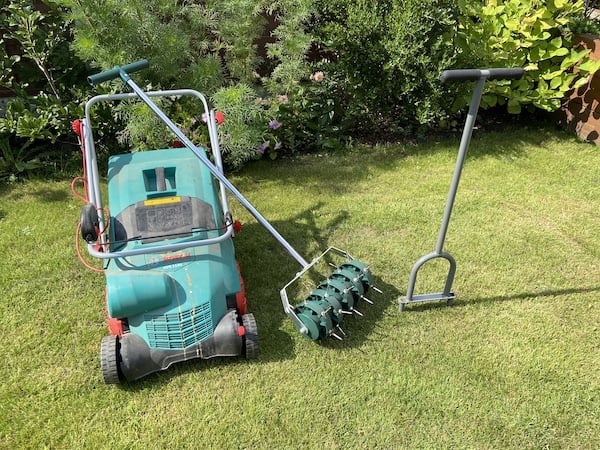
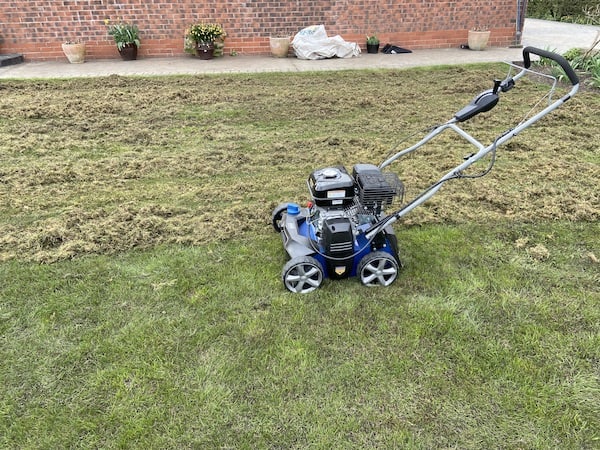
If you have a large lawn or using a manual model seems like too much work, then I would look at investing in a good electric or petrol scarifier/aerator. Most of these models are both scarifiers and aerators. Some models have two attachments you can switch between, one with thick steel blades for scarifying and one with wire tines for aerating. You can see my own petrol scarifier, which is the Hyundai Petrol Scarifier/Aerator in the picture below, and it is one I recommend highly.


Finally, I’m also a fan of some of the electric aerators/scarifiers, one prime example is my Bosch Verticutter which I have been using for at least 5 years now. This only has the solid steel blades and not steel wire tines. However, it still does a great job at aerating if used on a high setting because it penetrates the ground making grooves and this also improves aeration.
If you want something smaller with separate cassettes so you can switch between scarifying and aerating, then this AL-KO Comfort 38E Combi-Care 2 in 1 Scarifier/Aerator is well worth considering too. This is great as you can also use it for scarifying and then switch to the wire tines in minutes to use as an aerator.

Top 5 Lawn Aerator Reviews
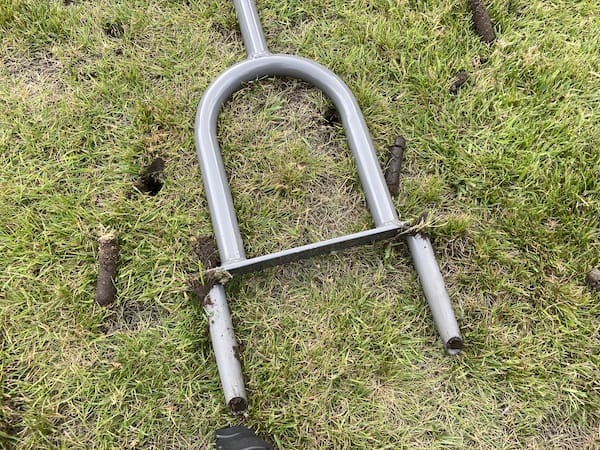
1. Walensee Lawn Coring Aerator
Best Pick
Buy from Amazon.co.uk

When I think of aerating, as a professional gardener, I always think of using a machine to remove cores from the lawn. Now, although this is not a machine, this manual Walensee Lawn Coring Aerator tool does an excellent job. Because it only removes two cores at once, it’s also fairly easy to use and push into the ground when compared to other models I have tried with four or five hollow tines.
The problem is, if you have four or five tines, you only need one of the tines to hit a stone or an extra hard area of lawn and it stops you from pushing the other tines into the ground. Let me tell you, it’s really frustrating, however, with models that only have 2 tines this doesn’t really happen very often, if not at all.
Now because it’s easier to push into the ground and only has two hollow tines. I find it’s just as quick to do a whole lawn as using a larger four or five tine version so it’s not like it takes any longer.

The overall design is also very thought out for such a simple garden tool. Starting at the T Bar handle, it has very comfortable foam grips, they are obviously very good quality and the foam is not too soft. The frame is made from heavy-duty yet light steel. I feel it is heavy enough where it’s obvious it’s a very well made tool, one that will last for years but it’s also not too heavy either.
When it comes to design, this is important. First off, it has a nice large foot bar to help you drive it into the grass and the tines are also well designed too.
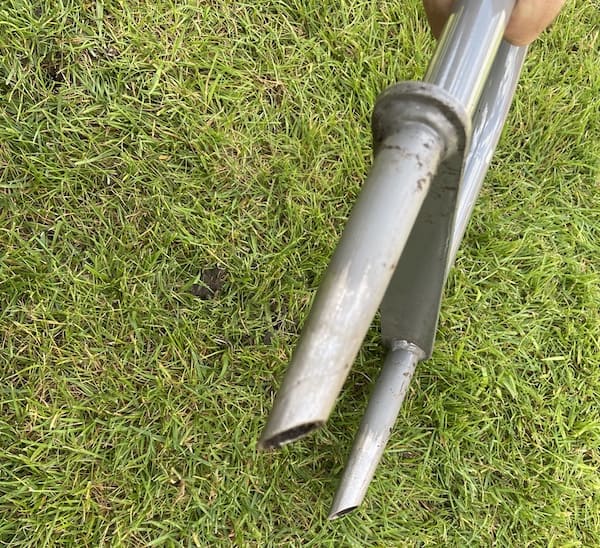
On some of the previous models I have used, the tines have had straight edges where they are pushed into the ground. However, on this model, they are slightly angled (as you can see in the picture above) and it just means it is easier for it to cut through the lawn and then be pushed into the ground.
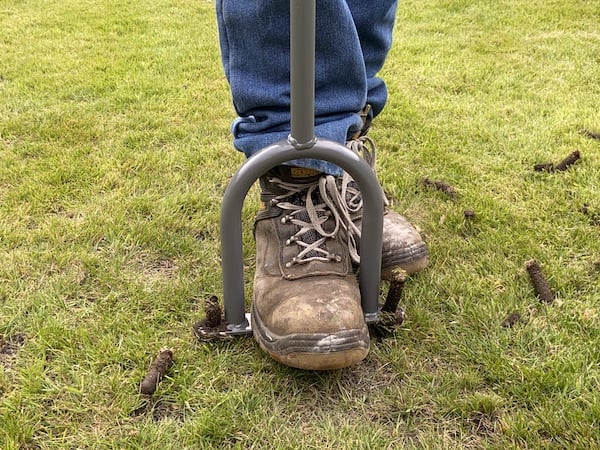
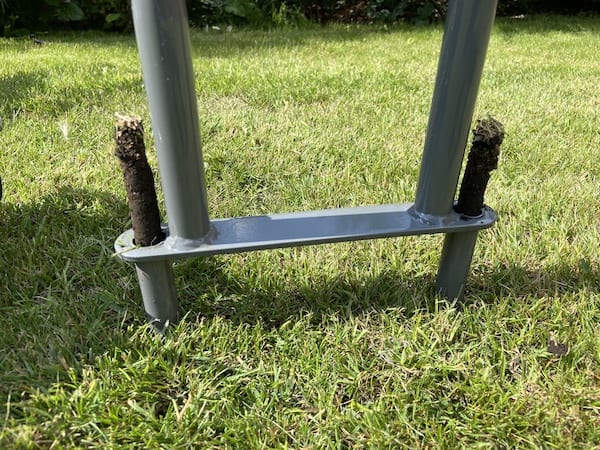
Using this tool is very easy and straightforward, you simply hold the handle with two hands and then use your foot and weight against the foot bar to push the hollow tines into the ground. As you do, they push the previous core out of the top of the tine and the process continues.
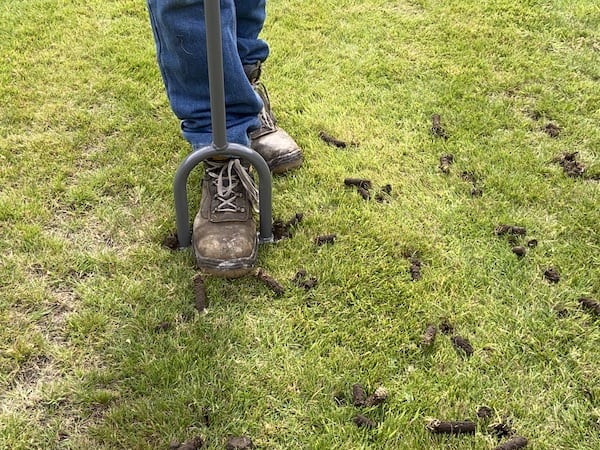
It is not the fastest way to aerate your lawn but I would say it’s the most effective, and by this, I mean it does a proper job and actually removes cores from the lawn. This is much more effective and beneficial than just poking tiny 2 inch holes into the lawn with a spiked aerator on a roller. The tines themselves are 4 inches long and 3/4 inch wide which is roughly how big the cores are that it removes. I will also mention that you want the holes to be around 6-12 inches apart, the closer the better I find.
After I have finished, I usually just collect the cores with a rake or on my hands and knees and compost them.
Our recommendation
When it comes to aerating, there is no better way to aerate a lawn than using a hollow tine aerator which removes actual cores. That is what the Walensee Lawn Coring Aerator does, and it does it well. I’ll admit, it’s not the fastest way to aerate but I truly think is the most effective.

Now, you’re probably thinking, what do you do with the holes? Well, I usually leave them as they are and the lawn with naturally expand and the holes will close themselves. You can use some lawn sand, usually in autumn or some lawn dressing in spring, however, this is easier said than done, and it’s no easy task.
The lawn has to be very very dry or the holes will just get clogged up and then you can apply and spread the dressing/lawn sand over the lawn and into the holes with a stiff brush. If I do use lawn sand, I usually apply it once the lawn is completely dry and then do it again a couple of days later as the sand usually settles into the holes and I can apply it again.
Overall, if you have a small garden or even a medium-sized lawn, this is the aerator I would always recommend. You can also get petrol powered aerators with hollow tines but they are very expensive, but you can also look at renting one if you have a very large garden.
2. Greenkey 30cm Rolling Lawn Aerator
Runner-up
Buy from Amazon.co.uk
The Greenkey Rolling Lawn Aerator is very effective at aerating lawns and I would say that when it comes to performance, ease of use and price, it really is hard to beat which is why I personally use this model myself. It’s what I use to aerate my lawn several times a year over the summer to keep the lawn aerated.
At 30cm, it’s not as wide as the similar Yaheetech aerator I had previously used, but it has longer spikes which I think is more important than the width. It is slightly better in terms of quality when it comes to manual aerators like these. All in all, I’ve been really impressed with this aerator.
This Greenkey roller lawn aerator is lightweight but still heavy enough to penetrate into the lawn at around 2.8kg. In the past, I have found that some lighter models ride above the lawn on the spikes which is a problem. This means that with this model, I didn’t need as much force to roll it, especially in softer soil areas. Something I would say is that it’s much easier to use and effective if you use it when the lawn is wet.
When I first unboxed this aerator there was some assembly needed, however, it was easy enough and only took me around 30 minutes. It comes with lots of small rubber caps and you can insert these over the end of the nails before building the aerator to prevent it from spiking you with the very sharp tines whilst you are putting it together.
I strongly recommend you do this, I cut my hands a few times because the spikes are incredibly sharp. I thought I would just save some time and be extra careful, however, I soon regretted this.
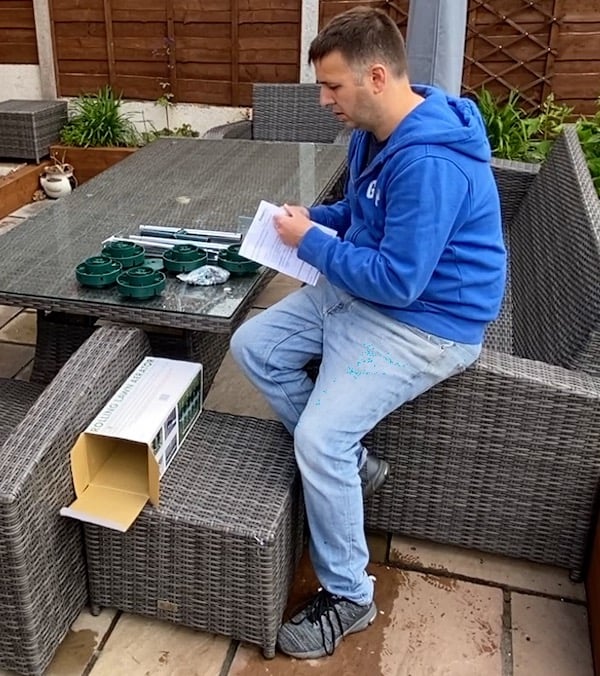
Assembly is easy enough, you simply insert the spikes into the green wheel parts and fix them into position with the bolt and smaller spanner, using an adjustable spanner works great. Next, you simply thread the green round spiked sections onto the shaft as I am doing below.
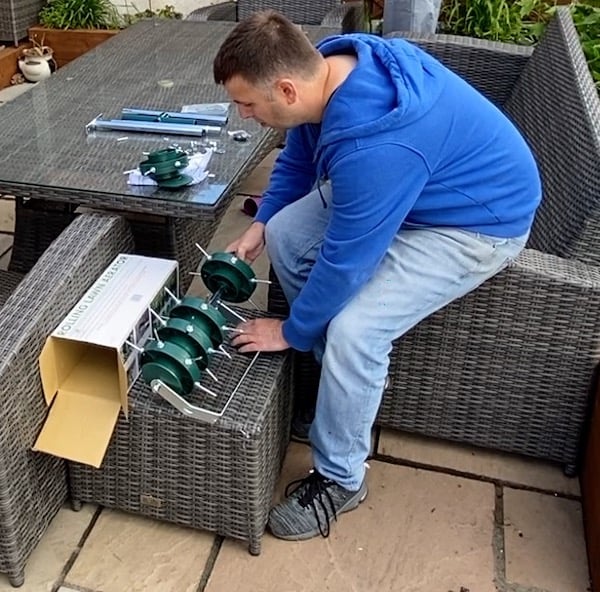
Next, I bolted the 3 sections of poles together, inserted the T-Bar handle and it was ready to use.
Overall, the spikes that are responsible for making the holes in the ground are durable and strong. They are made from stainless steel material (I think) so it is easy to wipe them down.
My only complaint with this model (but it’s no worst than on other manual models) is there is a little movement in the shaft. This is because it is made up of three sections and not just one long handle. It just means that there is some slight movement when you roll it alone, however, it doesn’t affect its performance, so it’s only a little niggle if I’m trying to find something I dislike with it.
In terms of how easy it is to use, I really do like it. I think it’s a good choice for smaller and medium-sized lawns and will save you a lot of time, especially if you usually just fork your lawn as I have done in the past on my own lawn.
I do find it works better if I put a little pressure on the main shaft while pushing it forward, that way I find the spikes penetrate into the lawn a little better.
Pros
- High-quality aerator that is designed to last and penetrates into the lawn well.
- Offers a wide aerator surface of 30cm to cover more ground faster.
- Easy build in around 20-30 minutes (put the black caps over the spikes before building).
- It has 30 spikes to ensure aeration of the soil is effective using the long and very strong 5cm inch spikes.
- It is lightweight at 2.8gk but still heavy enough to penetrate the lawn in soft soils.
- Features an ergonomic T-handle for manageable steering.
Cons
- Need a spanner or adjustable spanner to build.
Our recommendation
The Greenkey Rolling Lawn Aerator is the model to invest in if you’re looking for something a little better than a basic model. The length of the spikes is just about the right length at 5cm, and it is wide enough to let in air and water effectively without messing up the aesthetic appeal of your lawn. I have noticed that where my lawn used to puddle in heavy rain, it no longer does this now after aerating the lawn.
It is not an inexpensive aerator either, but that being said, it’s not really that expensive for a good garden tool, and with good care, it can you serve for many years to come. I like that I can disassemble the main shaft with just two screws and this makes it much easier to store although it’s too large to be stored in the original box which is a shame.
If you’re looking for an aerator that has all the features and better build quality than most others, then the Greenkey Rolling Lawn Aerator is worth your consideration and it is the model I would recommend most people get, or at least carefully consider.
3. AL-KO Comfort 38E Combi-Care 2 in 1 Scarifier/Aerator
Buy from Amazon.co.uk
The AL-KO Comfort 38E Combi-Care 2 in 1 Scarifier/Aerator, despite its name, actually has three functions. This 1300W electric machine does scarify and aerate, but it also has a 55L bag catcher that collects the thatch, moss and other plant bits you pick up when scarifying your lawn. Something to note, it does fill up very quickly so it might be easier to not use the bag sometimes and just rake the moss into piles once you have finished.
I include this multi-functional model in my Best Aerator review because if you have a great deal of lawn thatch on your grass (especially in spring), you need to remove this barrier before you aerate your lawn. I do have a separate review for scarifiers but you may prefer the convenience of this all-in-one machine as it also comes with a second attachment for aerating the lawn.
The scarifier has 14 steel blades to pick up the organic material from between the grass and the soil. The aerator has 24 steel tines that create holes in the ground for the subsequent water, nutrients and oxygen to reach the grass roots.
Pros
- Electric scarifier with three-in-one functions of scarifying, aerating and grass catching for a one-stop lawn care machine.
- 1300W motor provides enough power to groom a small to medium lawn, especially in spring.
- Working width is a generous 38cm for fewer passes across the grass.
- Scarifier has 14 steel blades and there are 24 steel tines in the aerator roller.
- Change to the aerator roller easily without the need for a tool.
- A large 55-litre grass collection box won’t see you running to the compost heap often with the thatch, moss and plant bits.
- Single dial control lets you adjust to one of the five depth selections.
- Height adjustable handlebar reduces strain and stress on your muscles.
Our recommendation
The AL-KO Comfort 38E Combi-Care 2 in 1 Scarifier/Aerator allows you to scarify your lawn in a separate process before you aerate it. Removing the lawn thatch that stands as a barrier between the grass and the soil lets the spikes on the aerator roller go fully down into the ground. This combo model has a 38cm working width with 24 steel spikes on the aerator. This lets you aerate a small to a medium-sized lawn in good time.
If you have a medium-sized or larger lawn, this could be well worth considering although it won’t aerate as well as a manual hollow tine aerator.
4. ZDTech Lawn Aerator Shoes
Buy from Amazon.co.uk
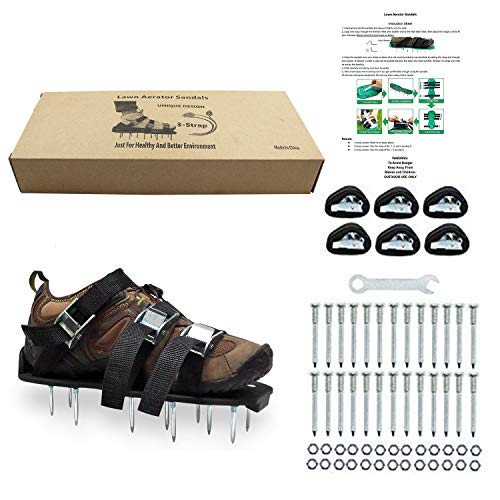
These shoes are a one-size-fits-all-type aerator sandal and are the best ones I found amongst the many types available. The sandal is made from durable material and seem to be well-built.
The straps are well woven to secure your boot to the aerator shoe. The metal buckles cinch the straps tightly to really hold your foot in place as it moves and they are a really good fit. Each sandal has three straps and the metal buckles are a step up from the usual fasteners that are made of plastic and are easily breakable.
Each sandal holds 12 spikes that are fastened through holes in the sandal plate. The spikes are 5cm long, producing holes in your lawn to a good depth for reaching the grass roots. Different soil textures give different results, and the spikes will sink easier into soft soil. This also means that you don’t have to press down so much in looser soil. You really get a workout if you aerate grass that’s growing on harder packed soil.
Wear closed-toed shoes with a strong sole when you’re using these aerator shoes. This is to protect your feet in the case you trip or a spike gets loose and starts pressing up. Always double-check that the spikes are inserted into the shoe correctly before you start the aeration process. These sandals are the perfect way to do light fertilisation or maintenance of a small lawn. It is also a great workout!
Pros
- Perfect for aerating small lawns while exercising by walking on the lawn.
- Well-woven straps that are secured with metal fasteners keep your feet securely in the shoe.
- The heavy sole is able to handle the pressure applied by the spikes and the user’s weight.
- Features enough spikes to make the most impact in one motion.
- One size fits all design.
- Lightweight, so they’re not too heavy for your legs to lift up.
Cons
- Buckles are a little difficult to fasten.
- Only really useful for small lawns.
- Assembly is fiddly and takes some time.
Our recommendation
The ZDTech Lawn Aerator Shoes are very affordable but using them seems to take some practice and some flair. The idea is great though, but assembly is a bit tricky. You have to be patient to fix every individual screw and fit the sandal with your regular shoe on. This aerator shoe is well made and more durable than others we looked at. Other than needing patience, the sandal is easy to use in soft soil. On hard soil, you will have to apply more pressure and you may get tired easily.
If you need a simple pair of aerator sandals for your soft soil then this model is my choice.

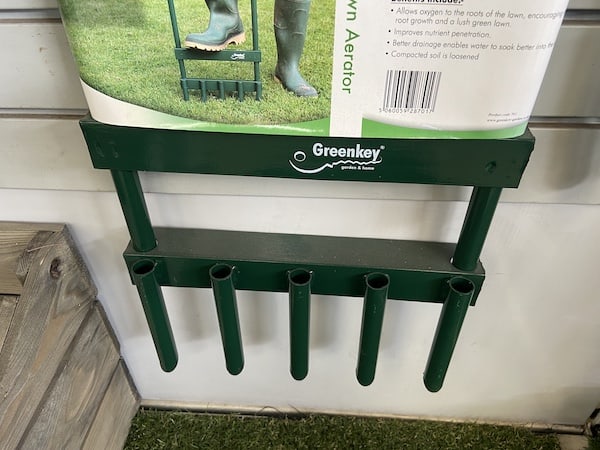
5. Garland Heavy Duty Hollow Tine Lawn Aerator
Buy from Amazon.co.uk
The Garland Heavy Duty Hollow Tine Lawn Aerator is a manual aerator fork (like my best pick) but with more tines, 4 in total, which is 2 more than my best pick has. However, as I have already mentioned, more is not always better.
The tines are constructed of stainless steel. Stainless steel is durable and rustproof and works well digging through wet lawns. The tines aren’t tapered which makes it more difficult to push the fork into soil that isn’t soft or loose.
The Garland aerator fork has a T-shaped handle, which is ergonomically designed to evenly spread the pressure you need to apply to dig the fork into the ground. This saves your shoulders and arms from unnecessary stress.
Pros
- Made of stainless steel, therefore, more durable.
- Features four sizeable tines that dig deep into the ground.
- It is lightweight, therefore easy to use and store.
- Comes with a T-handle for better manoeuvrability.
Cons
- Tines tend to get clogged up.
- Tines aren’t tapered.
Our recommendation
The Garland Heavy Duty Hollow Tine Lawn Aerator works well on soft soil but not so much on hard soil. Due to the tines not being tapered, it’s also hard to drive the aerator into hard soil. The handle is very comfortable to use and suits those who have upper-body problems.
If you have a small lawn on sandy or loose soil and need an aerator that’s easy to push down on, take a look at this one but if I’m honest, I would recommend the smaller 2 tine model over this.

FAQ
What’s the difference between scarification and aeration?
Scarification and aeration are both tasks for lawn care.
Scarifying is the removal of thatch and moss from your lawn. Thatch is the build-up of organic material such as old grass stems and leaves that may have blown there in autumn. It sits between the healthy grass and the soil, forming a barrier. Bacteria in the soil digest this organic material into nutrients for the grass and anything not digested remains in a layer on the top. This thatch stops moisture, oxygen, carbon dioxide and nutrients from reaching the grass roots.
Aeration is the process of punching hundreds of small, fairly deep (about 5cm) holes into your lawn or removing small cores of soil. This is to let water, oxygen and nutrients reach down to the grass root system to keep it healthy and strong. If you apply a lawn dressing, this can then be brushed into the holes.
Why do I need to aerate my lawn?
Aerating your lawn creates channels to allow water, oxygen and nutrients to reach down to the grass root system so your lawn becomes healthier.
Here are some signs that your lawn needs aerating:
- You have a lawn with bare patches or dry spots
- Your lawn is growing in clay soil
- You want to reseed your lawn and want the best germination rate
- Parts of your lawn are waterlogged and you want the water to run off somewhere
- You plan to weed and feed your lawn
- People and animals are frequently playing on your lawn and compacting the soil.
Final Conclusion
The models I review here are primarily manual lawn aerators. For powered models, see my Scarifier Review. I have also covered petrol scarifiers here which also feature aerator-compatible models.
Lawns generally flourish if given the right care and attention at the right time. Use an aerator to do regular maintenance before applying lawn sand or lawn weed and feed in autumn and spring. Electric aerators are better at facilitating large-scale aeration but manual models give you more control over what happens to your lawn. Just make sure that the spikes are sharp enough to pierce the ground and that the handles are comfortable and ergonomic.
Last update on 2025-07-11 / Affiliate links / Images from Amazon Product Advertising API
1 Comment
Thank you for compiling this amazing list. I’m glad that I came across this guide. It will help me in getting a new plug aerator.