Our family has always been an animal-loving kind of family, and we have always kept chickens. Even when I was little, my dad kept a wide variety of chickens. Over 30 years later, we still keep chickens as well as guinea fowl, three shetland ponies, a welsh cob, and my brother also keeps some pygmy goats as well as pheasants, but that’s a story for another time. We are lucky enough to have space at my dad’s house (some compare it to a farm), although others might consider it a smallholding.
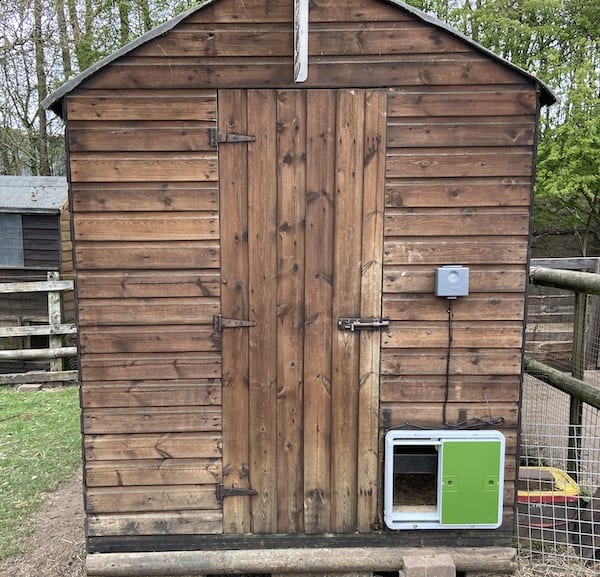
So in this review, we are going to take a look at the Omlet automatic chicken coop door which I installed on one of our chicken coops/converted shed.
Full disclosure, Omlet sent me this chicken coop door for free to see what it is like, but this in no way persuades what I say in this review. These are my own thoughts and experience with installing and using it. If I don’t like it, I will say so!
Watch my video review
Quick overview
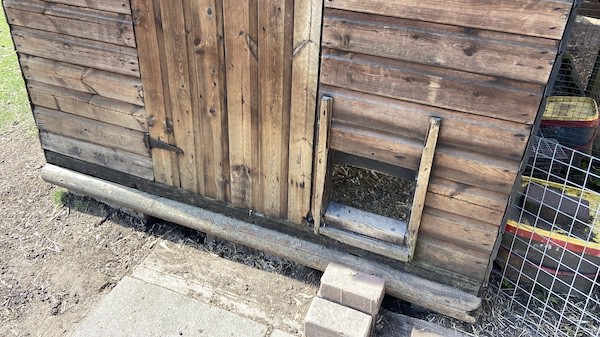
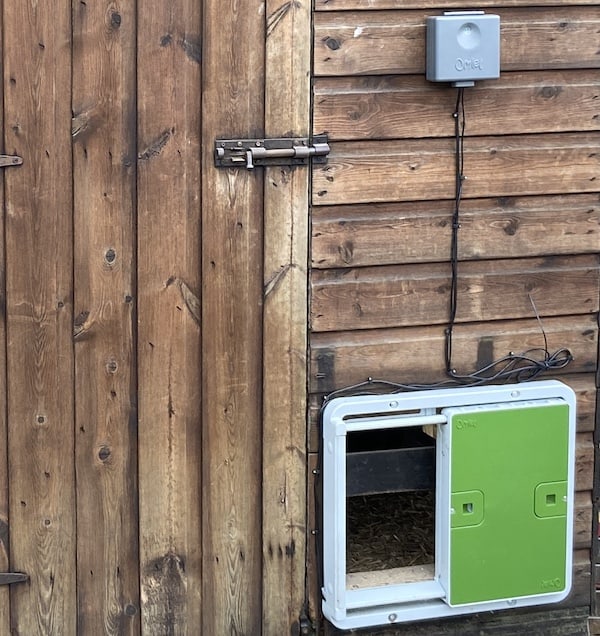
As previously mentioned, I installed this to an already existing chicken shed. Installation was much easier than I thought it would be. Since our chicken shed has been altered many times with different doors over the years, I had to make a few tweaks, but it was straightforward to do.
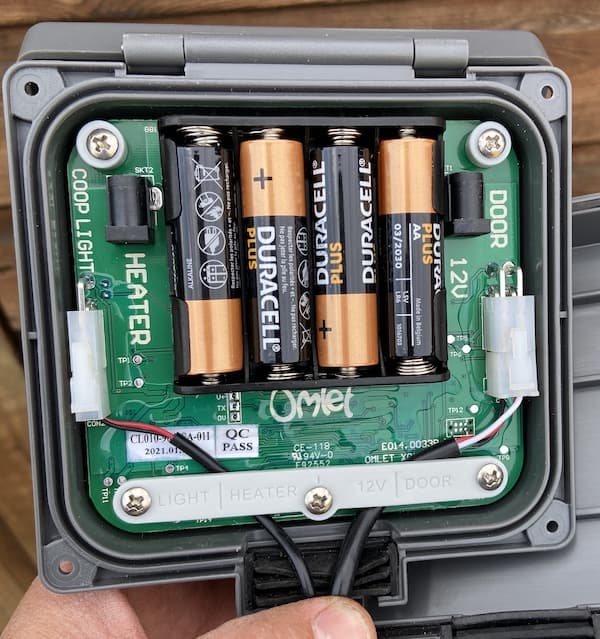
You essentially create an 8″ x 12″ hole and fit the door over the top using four bolts. Attach the control panel and connect it to the chicken door using the wire. Insert 4 AA batteries (I used Duracell), choose either the timer or the light setting (currently I’m using the timer), and it’s ready to use.
It’s one of those things you don’t know you need until you have one. It’s reliable; no more having to go out early in the morning to let them out or making the mistake of forgetting to close the door, which could potentially be deadly (for the chickens, not me).
Final thoughts, it’s expensive; however, I think for the convenience and safety of the chickens, it’s worth every penny, and I do plan to fit another one to the other chicken coop we have.
If your looking for a chicken coop or run check out my guide here with some good models to consider
Let’s first talk about Omlet
Omlet is a UK company based in Oxfordshire, and they are famous for designing and developing the plastic Eglu chicken coop. Since then, they have created a large selection of innovative products for lots of animals, not just chickens. However, the chicken coops and runs are what caught my attention. The products they make are high quality and well thought out. I believe their customer service is fantastic, although I have not had to use it. Word in the coop is, it’s just as impressive as their products which I have used. Overall, other companies could learn a lot from Omlet – They also have an excellent website – check it out here!
When it arrived
So when it arrived, I was excited to get started. I was attaching it to a wooden coop, so I had everything I needed. Something to note, there are additional attachment kits if you are fixing it to the original Omlet Cube Mk1, traditional mesh wire or an Omlet run. The only attachment I ordered was the coop light but more on this later.
So it came almost entirely built. However, there were lots of screws and fixing in the box. My first thoughts were, ‘what have I got myself into’ but I needn’t have worried. The manual was also super thick, and I’m not a reading kind of guy.

It turns out, a lot of the spare parts are for if you are installing it to an Omlet Iglo chicken coop or traditional wire mesh, both of which I wasn’t. I only needed four bolts and four wing nuts to attach the door, and a few screws for the controller. It turned out, the manual has instructions in different languages. I only had to read 3/4 pages to install it, and it was simple, easy to follow pictures.
Installation – they couldn’t make it any easier; anyone could do it.
So the first thing I had to do was fit the steel cog to the motor and attach the door to the frame. It was straight forward though, I’m not sure why this is not already done for you.
Attaching the steel cog to the motor
Anyway, the first thing I had to do was attach the cog to the door motor. All you need to do is turn the frame back side facing up and remove the two small screws to the left of the open.
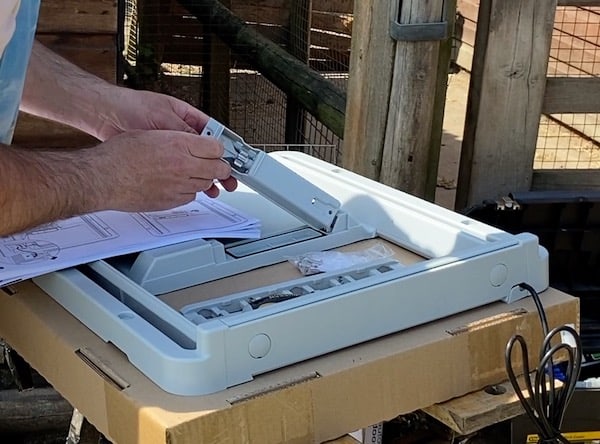
Once you remove this (be careful as it’s still attached to the frame with wires), you will see a small electric motor. The steel cog and a small plastic triangular piece slot onto the spindle to hold the cog in place. Next, you need to put the motor back into position and put the two screws back in place.
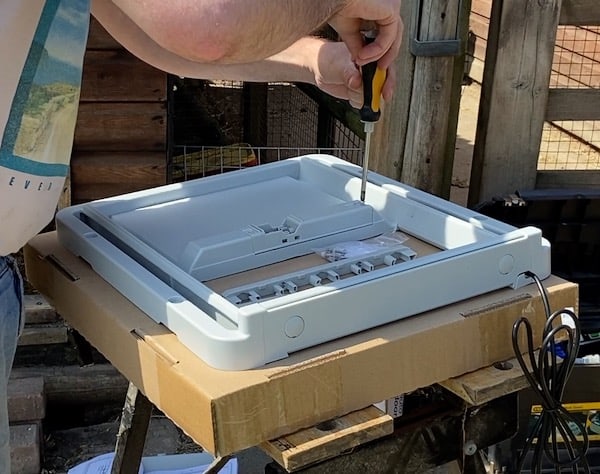
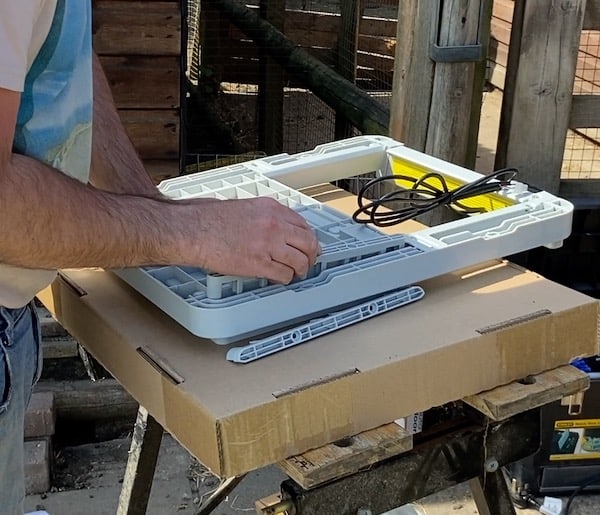
Attaching the two side pieces that hold the sliding door to the frame
The final piece to the jigsaw is to attach the door to the frame. I placed the door onto the frame in the fully open position. Next, I carefully turned the frame and door over with the back facing up.
There are two long plastic pieces, as pictured below. I had to fit them into position (they only fit one way) and screw them into place with the four included screws. This whole process only took a few minutes to do. The door was now fixed to the frame and was ready to be mounted to the chicken shed.
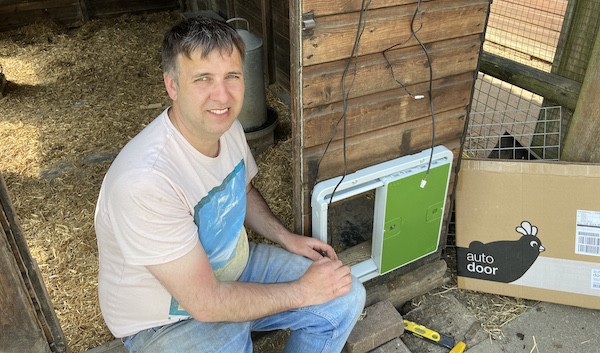
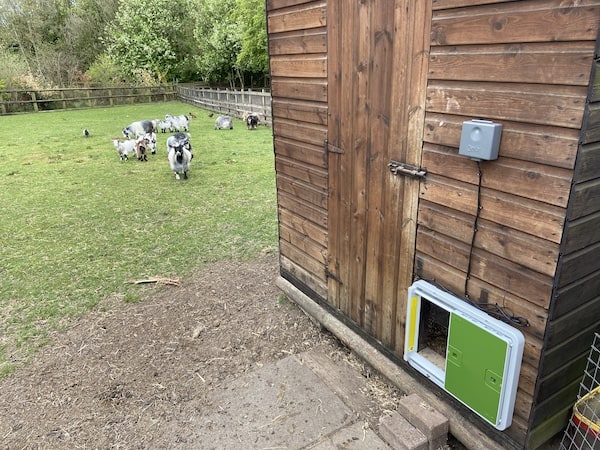
Attaching the automatic chicken door to the shed
This part would have been much easier if I had not already fitted a chicken coop door to the coop several times over the years. So what I needed was an opening of 8 inches wide by 12 inches tall to fit the automatic chicken coop door over.
In my case, it was wider, perhaps 10-11 inches but about the right height already. I did need to trim a little off the opening to get it positioned where I needed the door to be.
It can be fixed to open left to right or right to left
At first, I thought it could only be positioned so that the door opened only left to right. I realised this was not going to work for me straight away, so I was happy to learn it can be turned upside down to open, right to left. The logo is even upside down at the bottom, so the logo in the top left corner is the right way up no matter which way you have it.
All I had to do now was hold the door in position on the coop, make sure it was level with a small spirit level and mark where I need to drill the holes with a pen to fix the door to the coop with the supplied bolts, metal plates and wingnuts.
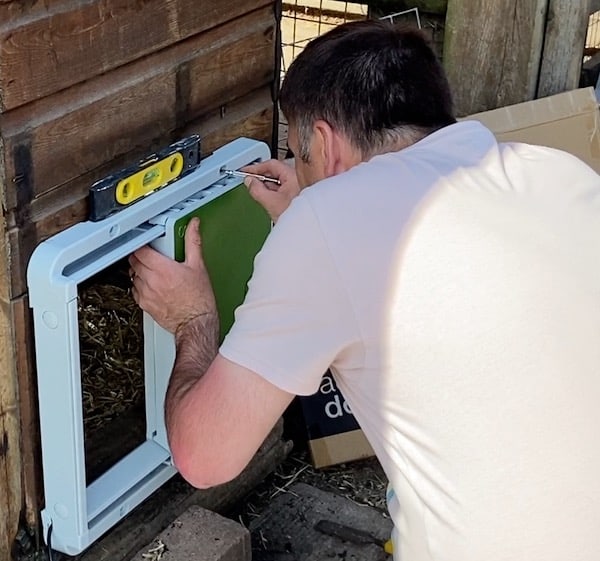
Once the four holes were marked, I drilled the holes and fastened the door to the shed using the metal plates and wing nuts as shown below.
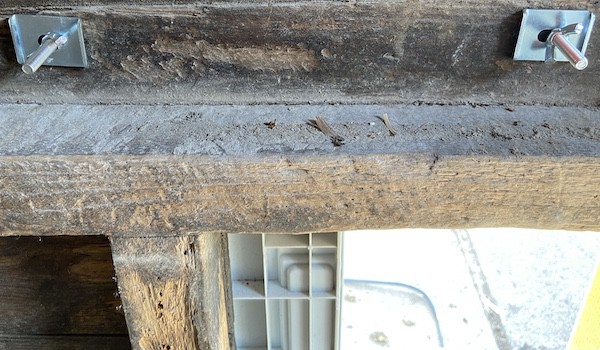
However, it wasn’t quite as simple as that, where two of the bolts holes were, I have a beam In the way. Had this been the first door I had fitted, I would have just adjusted the position of the door slightly to miss the beam, but remember, this hole has been adjusted more times than I can remember.
This is where my DeWalt oscillating multi-tool came in handy (you can see my review of this highly recommended tool here). I only need to cut away a small part of the beam to create enough clearance to get the bolt, metal plate and wing nut in place, as shown below.
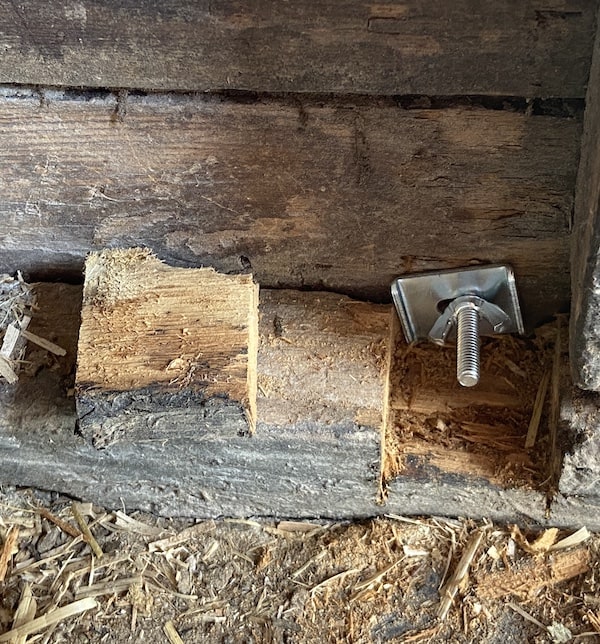
The other bolt was a little harder to get to, so I switched the bolt for a small washer and long screw, which did the job.
Attaching the controller
Once the door was attached, it was time to attach the controller unit to the shed. This was also very easy. There is a small triangular metal plate as pictured below.
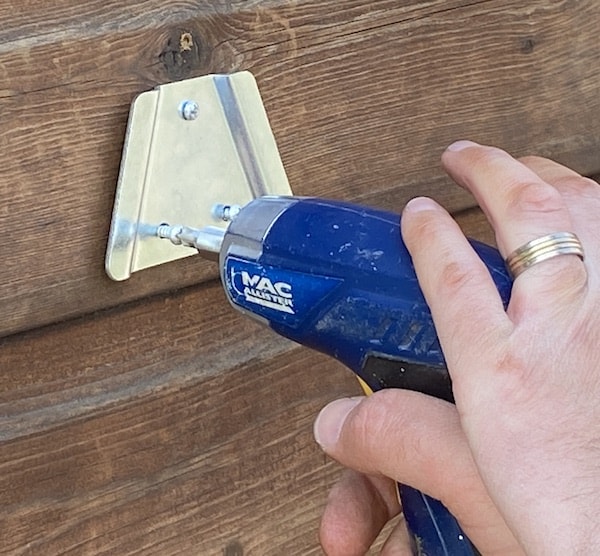
Simply screw this in place with three small screws, and the actual controller slides onto the plate. Before you do this though you will need to remove four screws from the controller to open it up so you can see the connections and battery compartment, as shown below.
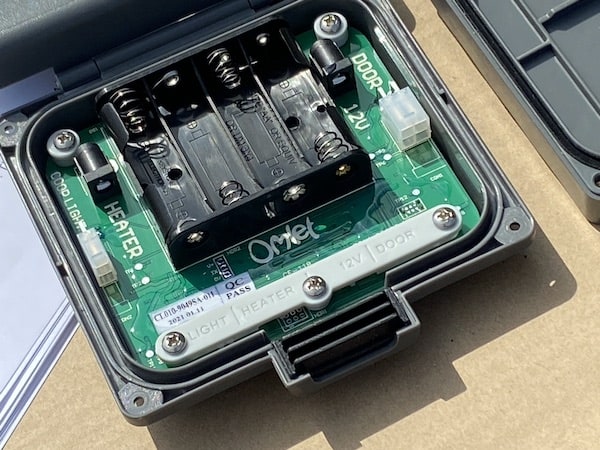
You will see some little plastic connections. One is labelled ‘DOOR’. I attached the wire from the door here and it just clicked into place. There is also one labelled ‘COOP LIGHT’. I have the coop light, so I attached this here. There is also a place for a heater and 12v for mains power, however, I don’t use either of these.
However, they are nice features to consider, perhaps. If you live in a very cold area, the heater might help the chickens and stop the water freezing but I couldn’t find the heater option on their website? Being able to attach mains electricity would just mean you don’t need to change the batteries, but I had no power close enough to do this, so batteries it is.
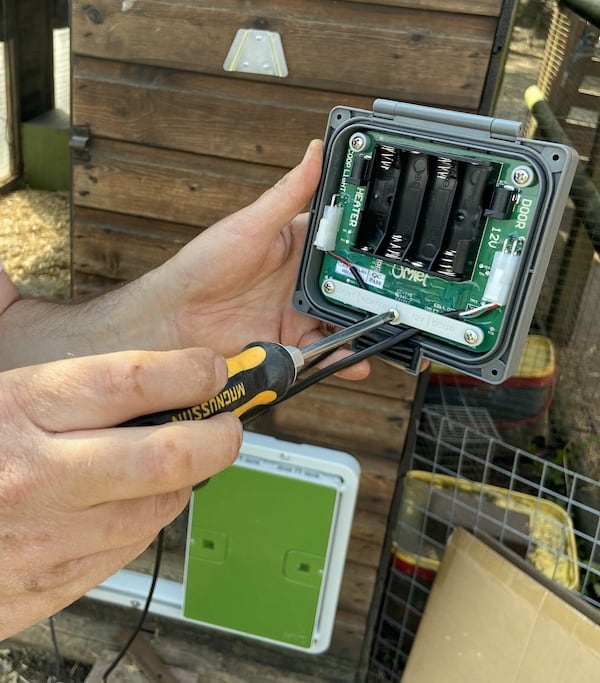
With the wires connected, I now just had to insert 4 AA batteries. Finally, I attached the back panel back onto the unit with the four screws I removed earlier and slid the unit onto the metal bracket.
That’s it; I tidied the wires up and clipped the wires securely with some cable clips. This is something that wasn’t included; luckily, I had some already. It did come with cable ties which came in handy.
Adding the additional but optional coop light
So my chicken door also came with the additional coop light you can purchase as I ordered this too. I wasn’t sure what to make of this or what it was even for. After all, I have never had a light in the chicken coop in over 20 years. Anyway, I also installed the light inside the coop above the door.
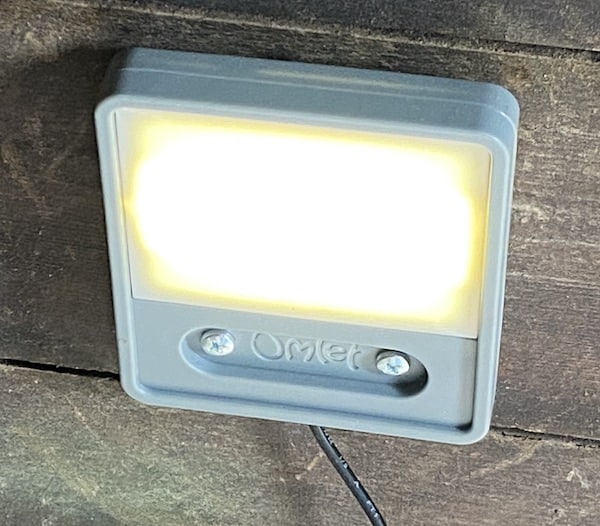
It comes on 5 minutes before the door is set to close, and the idea is that it encourages the chickens to come inside the coop before the door closes. Now I have turned this feature off as I worried it might decrease battery life, and my chickens are always in well before it closes anyway. However, it’s handy as you can turn it on manually, so I have left it in, just not set to come on before the door closes.
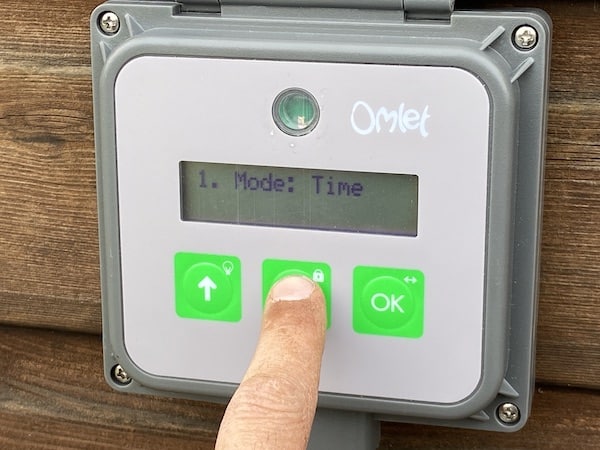
Setting up the controller
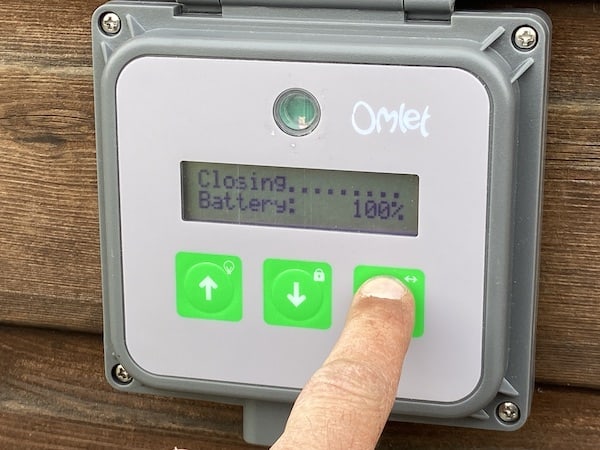
With everything set up, it was time to set and test the controller and door. So setting it up is easy, and there only 3 buttons on the unit, + button – button for moving up and down through the options on the LCD DISPLAY and an ‘OK’ button to confirm changes as well as open and close the door manually.
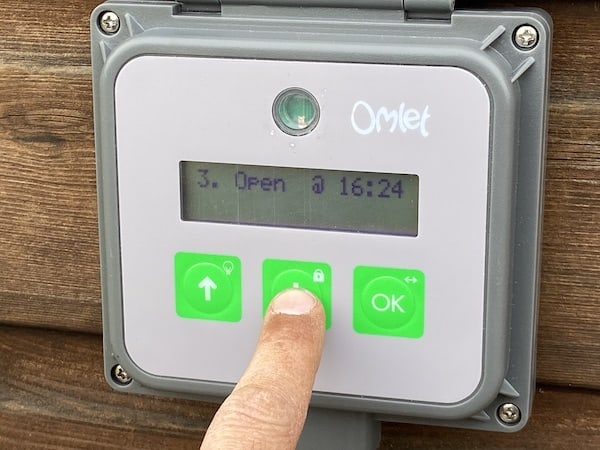
The instructions are very clear, and setting up was straightforward. First, you set the time and then you choose your opening door option.
You have the option to use the light sensor, so the door opens up automatically every morning and evening. I had to play around with the number setting, which changes the sensitivity of the light.
If you find it opens a little too early or closes a little later than you prefer, you can adjust the light sensitivity setting independently for opening and closing. This is great as it gives you more control.
For me, I decided the timer option was better. I currently let them out at 7.30 am and it closes at around 9.30 pm, but I will need to adjust this for the time of year, two or three times a year.
The reason I use the timer and not the light sensor is that although I have an electric fence around our paddock, the chicken still jump over the electric fence into the woods next to paddock.
The issue is the light sensor would open a little too early, and the foxes could still be around as we often see them in the morning. For this reason, I opted for the time setting as it works the best for me.
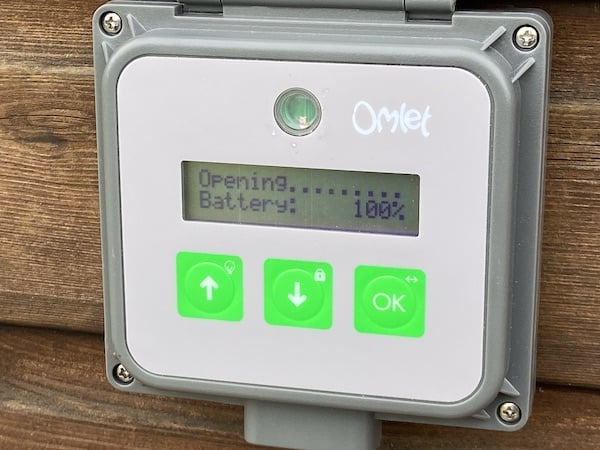
I also like you can override the automatic option at any time by pressing and holding the Ok button for 3 seconds which manually opens or closes the door. You can also see the battery power status too.
I also like that I can also hold the ‘- button’ for a few seconds to turn on the coop light even though I don’t have it set to come on 5 minutes before the door closes, as mentioned earlier.
The problem it solves
The main problem it solves is that you don’t have to open and close the door manually. If no one is around in the evening to close the door, no problem, you know the door is closed, and your chickens are safe. Same with opening, you know the door will be open in the morning, so I don’t need to worry about forgetting to open the door anymore, something that has happened more than once in the past.
What I really like is it solves the problems often seen on chicken coop doors that automatically open by sliding up and down. They are notorious for jarring and jamming. Foxes have also been known to push the door up to get access to the run. Not to mention, the other automated units are not cheap either, and most don’t include a door.
However, the Omlet automatic chicken coop door solves all this. There no way the foxes can get the door open. It won’t jam or jar, leaving your chickens exposed; it is easier to fit too. Don’t forget you even get the extra features of mains power and possibly a heater if you want to, and you can install this on mesh too and not just a wooden coop. These are all things you can’t do with most other models.
Safety
Now, this model also features a safety sensor so that it’s safe; as soon as it feels the slightest pressure, the door will not close. This is of course is designed so it doesn’t trap a chicken whilst closing. I tried this with my hand, and it doesn’t take much pressure at all to stop the door.
Final conclusion
In short, I don’t think there is a better automatic chicken coop door than the Omlet model. The build quality is impressive; it is well designed, easy to install, at least to a wooden chicken coop as I have done. The controller is easy to use, super simple to set up, even my dad can use it, and he struggles with a smartphone.
Up to now, I have not talked about the batteries and how often I have to change them. That’s because I have not had to change them yet. At the moment, it doesn’t seem to have used much power. It does show you the % of battery charge left in the batteries, which is important. I expect they will last longer than the six months Omlet say. I will give an update on this in the feature.
The only thing that is a little hard to overcome is the price, it’s expensive, but then again, I still think it’s worth every penny. Yes, there are some cheaper alternatives, but they don’t even come close to reliability. When you consider that this model by Omlet includes a door and unit (not just a timer and string), this is now the only model I would trust 100%. It’s also worth noting it comes with two years warranty though I don’t expect to need to use this, at least it’s there if I need it. Honestly, I would go as far as saying this changed my life.
I have also reviewed 4 other models of automatic chicken coop door openers in this review here
You can also check out my recommended chicken coops and runs in this guide