A wormery is a unit designed to recycle your kitchen scraps. These stand-alone units are home to worms who eat through your kitchen scraps and eventually convert them into compost that you can use in your garden. The liquid runoff from your kitchen waste, especially vegetable scraps can be diluted and used as a fertiliser as well.
You don’t have to order expensive kits online although it is still worth considering. You can make a wormery on a budget yourself if you like getting into a little DIY. Don’t worry, unlike compost heaps, wormeries don’t put out a terrible smell. They make compost significantly faster and they are smaller, which makes them perfect for tiny spaces.
Making your own Wormery
Worms need the same conditions inside the wormery you make as they would get in the ground, which means they need darkness, moisture and air. The easiest way that you can make a wormery yourself is to use an old plastic box or an old wooden box as your starting point. Make sure you have a shady space where your box can sit permanently, for example, underneath a table or a bench. Once you have space where your box will live, you will need:
- A large box with a lid
- A drill
- Two pieces of wood for the box to stand on
- Paper, newspaper, or cardboard
- Worms and worm bedding can be purchased online (yes you can actually buy worms on Amazon)
Find a suitable box
For this first item, if you have a large plastic box with a lid this is perfect. If you have a plastic box that doesn’t have a lid, you can improvise. Plastic boxes like recycling boxes are great because they are UV-treated which means they’ll last longer. You don’t really have to worry about a minimum size but the bigger the surface area, the more food waste you’ll be able to contain it. Anything smaller than 35cm in diameter is going to be very limited.
Once you have your box you now need a drill and you can get to work.
Drill holes in the base
Drill holes in the base. The worms need to have air just the same as you do, so make sure you put enough holes in the bottom of your container so that there is good airflow. A 12mm drill piece is best because it gives decent-sized holes. Holes that are too small can easily get blocked and if this happens, it defeats the purpose.
A tip is to place masking tape to the box in the areas where you want to drill the holes. This will stop the drill bit slipping and don’t apply too much pressure when drilling because you could crack the box.
Find something to use as a stand to raise the box off the ground
With that done it’s time to stand your box up. You need something to act as the feet so that air is able to go through the holes you have recently drilled in the bottom of the box. Placing the container on two bricks or pieces of wood is perfect. Make sure it’s as level as possible.
Add a layer of cardboard or paper to cover the holes
Once you have it in its permanent home place a layer of newspaper, regular paper, or cardboard on the bottom. This will help to prevent your worms from falling through the air holes. In general, if you provide a good environment in your wormery they will tend to stay put and not try to escape.
Drill more holes on the side, along the top and in the lid
Now it’s time to drill again. You want to put some small holes along the side of the container, at the top as well as in the lid. If you have a sheltered place where your wormery can call home, make sure you put lots of holes in the lid for air. But if your wormery is sitting somewhere in your garden where it is exposed to the air, don’t drill as many holes otherwise it might get waterlogged. In these cases add more holes along the side of the box near the top instead. Remember your worms need a lot of air but without too much light.
Add a good layer of bedding and your worms
Now your box is built, all you need to do is add the bedding. You can use worm compost, coconut fibres, homemade compost, or regular store-bought compost. This is where the worms will live and you should place approximately 3cm of it across the bottom of the box.
Worms will do best if they are in worm compost so it’s worth buying some online as it can be hard to come by them in retail shops. Once you have that it’s time to add your worms which can also be purchased online. The worms will want to settle into their new home immediately. You can buy these worms from a fishing tackle shop if you have no other options. The more you have when you start, the more productive they will be.

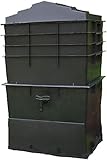
- 500g Wormery Startup Pack
- 500g Tiger Composting Worms (approx 400 worms)
- Worm Food, Caring for your Wormcity worms leaflet
- Coir Block Bedding
- Sent By 1st Class Post
Start adding kitchen waste to feed the worms
With the worm settling into their new homes it’s time to add a supply of food for them including things like coffee grounds, vegetable peelings, banana skins, and tea bags. If you chop up your kitchen waste your worms will be able to process it faster, so this is well worth doing. Avoid very oily or spicy things like citrus and onion skins. Also make sure you throw in some carbon-rich items like wood chips, newspapers, or cardboard. With this in place, it’s time to cover the surface of your worms with a sheet of cardboard, an old towel, or newspaper just to keep the moisture in.
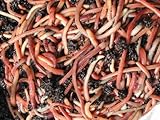
- Mixed Sized Composting Worms 500g (Approx 450 Worms)
- Great For Wormeries
- Supplied By Wormcity. A Leading Seller Of Quality Worms
- Fast 1st Class Post (We Dispatch Monday - Thursdays Only)
- Caring for your Wormcity worms leaflet included
Cover it up
Once that is done it’s time to add the lid. If you don’t have a lid you can literally secure a piece of plastic or wood on top of a box with some holes drilled inside. Get creative and then seal the deal by covering it up and letting the worms do their work. Add more layers when it’s time, and try to store the box somewhere it will be protected from the elements. Doing this will keep your worms happy and healthy, and give you access to homemade compost and fertiliser that adds nutrients to your soil.
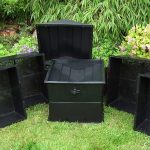
- Gardener's World Winner BEST BUY WORMERY
- Best Selling Wormery With Fabulous Reviews
- 500g Worms, Full Colour Instructions, Bedding & Worm Food INCLUDED ** Do Not Buy A Wormery With Less Worms **
- 100 Litre - 4 Trays=36% Bigger Than Our Rivals **DON'T BE DUPED INTO BUYING SMALLER**
- Made In England NOT Imported (like all the others)
Last update on 2026-07-05 / Affiliate links / Images from Amazon Product Advertising API