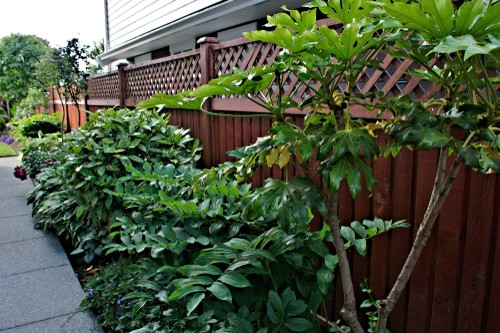
This strong evergreen plant is a wonderful addition to any garden that is looking to increase the tropical vibe. It can survive even the most unlit of corners in your garden where nothing else will grow. As long as it is reasonably sheltered from severe winds and other harsh weather it will live for a long time and provide you with ample structure throughout your garden for years to come.
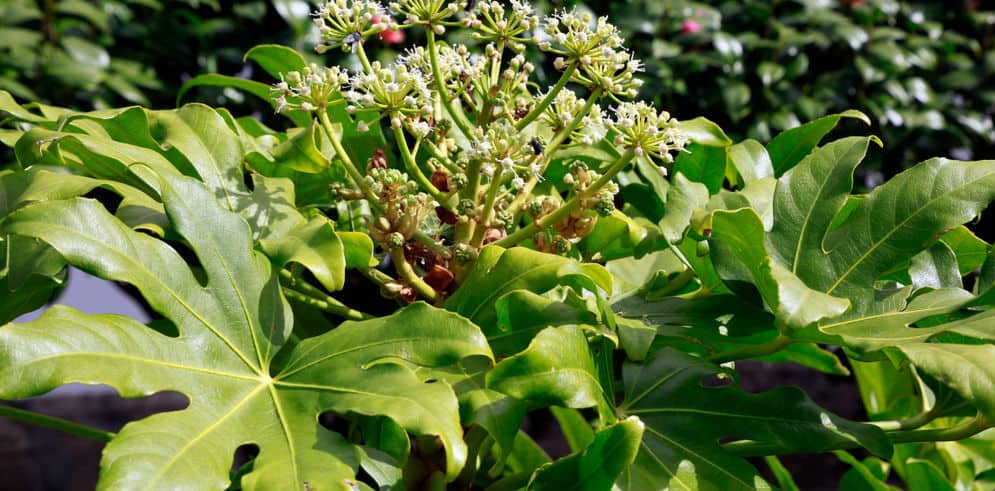
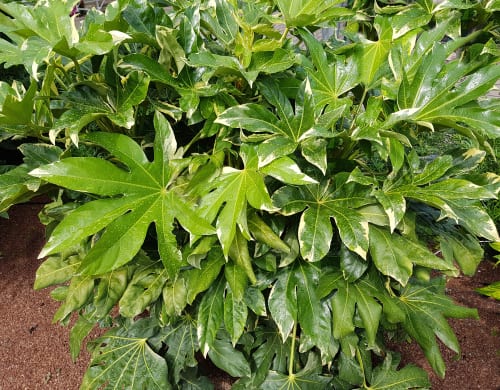
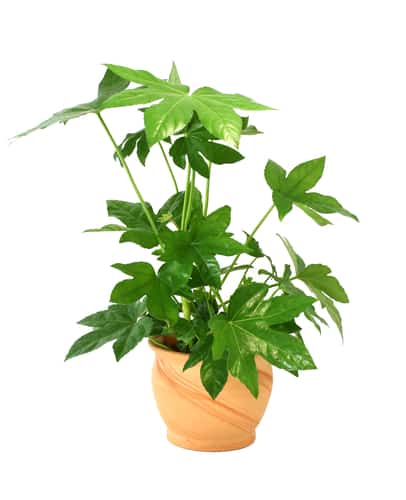
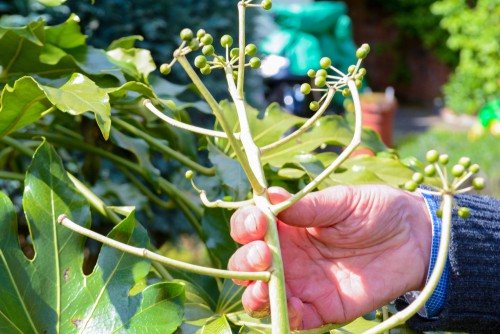
The leaves that you get with this plant are truly stunning, large and lobed, with a leathery texture that makes them look somewhat like large, outstretched hands. As the plants mature they also produce creamy white flowers in October and November and then beautiful black berries for birds. They can reach up to 4 metres tall but you can, of course, keep this in check with small pruning on a regular basis.
The plants are very simple to care for and even simpler to propagate. They are rarely impacted by diseases or pests and this makes them the perfect addition to a low maintenance garden. With this guide, you will be able to choose the right variety and properly care for it.
Plant overview:
- Common name: Umbrella plant, Caster Oil plant
- Scientific name: Fatsia japonica
- Height: 2-4 metres, but can be pruned to keep to your desired size
- Light: Prefers shade position, doesn’t do well with full sun
- Hardiness: Hardy down to -10°C
- Soil: Grows in rich, heavy soil
- Propagation: Propagate with seeds or cuttings
- Pests: Resistant to most diseases and pests
- Maintenance level: Easy
Varieties Available
This evergreen shrub offers standard green varieties that tend to be stronger with leaves that can reach between 15cm and 40cm depending on the type. This shrub brings with it a rounded shape that can get up to 4 metres in size depending on the variety as well.
When you purchase one of these plants from your local nursery and it has been grown inside vs outside, you need to consider how it will do in the location you plan on planting it in.
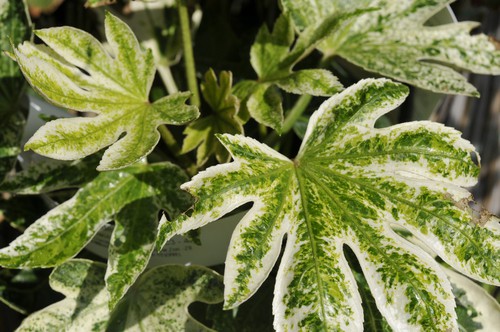
The variegated variety is a bushy shrub that is smaller than most and only reaches a height of 2.5 metres when it is fully established. The leaves are edged with cream and get up to 30cm wide. When it produces flowers they are small and spherical followed immediately by a beautiful cluster of tiny, black berries that will attract birds to your garden.
Fatsia japonica ‘Annalise’
Annalise is another variety that has dark green leaves splashed with emerald green, gold and yellow. The leaves can reach up to 30cm wide and the shrub itself will grow between 1.8 and 3 metres in height. It will do very well in shade and can withstand severe winter weather.
Fatsia japonica ‘Moseri’
The Moseri variety is a more compact option that has dramatic foliage. The flowers are large and they grow on white stems and produce larger black coloured berries. You will get flowers between October and January and the full plant will reach a height of 2.5 metres.
Fatsia japonica ‘Spider Web’
The Spider’s Web is called such because of the speckled white variegation it has on the leaves. It will flower between November and December and does very well if grown in deep shade. This one is much more slow-growing than the others and it can take a few years before it reaches the ultimate height of 2.5 metres. This variety is ideal for small gardens because it can be grown in containers and properly pruned so that it maintains a smaller size.
How to grow a Fatsia
These plants are rather self-sufficient, which means that they will look after themselves and you won’t need to do much other than water occasionally and apply fertiliser twice a year.

Plant in light shade and avoid full sun
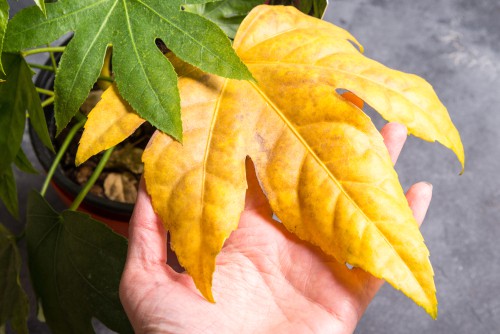
These plants prefer light shade and they will also do well, even in full shade. It actually doesn’t like being planted in full sun, especially afternoon sun, because this usually causes the leaves to yellow and wilt out of the harshness of the light.
Water during dry spells, especially newly planted Fatsias
When you are watering only do so during dry spells. This plant (like so many) prefers moist soil and doesn’t like waterlogged soil. Realistically most of the year you won’t need to add water, but during the summer you might need to on occasion. If you are growing these plants in pots you will only need to water it thoroughly when it dries out.
Soil
This plant will do quite well in all manner of soils, including heavy clay, light soil, chalk soil, but of course it prefers a rich and fertile soil. If you have poor soil you can always improve it rather quickly and easily with fertiliser or compost.
Feed in April and August
You can add fertiliser to this plant once or twice a year, however, it isn’t essential. It’s best to add a handful of organic slow-release fertiliser twice a year, first in April and second in August. You can always add a combination of fish, blood and bone fertiliser during those two months as well if needed. If you are growing it in a container you should feed it monthly between the middle of March and the middle of August.
Fatsia japonica Requirements
Where to plant – In a sheltered position out of direct sunlight
When do you decide to grow one of these plants you should begin this process in the spring so that the shrub has an opportunity to establish itself before the winter sets in. If your area is enjoying a heat wave and the soil is still warm in autumn, you can plant it during this time while the ground is still warm. When positioning it outside in your garden make sure that it gets a sheltered location that is protected against easterly winds and has shade. Depending on the variety it may need up to 2 metres of space (or more) in which to grow so be sure to allow for mature growth.
Planting
When you bring home the plant from a garden centre or nursery, dig a hole that is twice the width of the root ball. Add organic matter to the hole and work it into the soil. Then place the plant into that hole, making sure that when you do, it is at the same depth as it was in its supplied pot. Once it is placed into the hole, backfill and firmly pack down the soil. At this point, you want to water it well so that the soil has the opportunity to settle around the root ball and get rid of any pockets of air.
During the initial planting phase you want to keep the plant moist but make sure it doesn’t get waterlogged. This is something that you should do until such a time that the plant becomes well established.
Growing in a container
If you are planting in a container, pick one that is at least 60cm wide and 60cm tall. Use a loam-based compost for best results.
Fatsia japonica Care
This plant can be damaged by very harsh winters, even though it is able to withstand cold weather and frost. In the worst of situations, you might see dark, drooping leaves. You might even see that some of your leaves have turned black. Even if your plant looks very ill it will come back just as good as new once the weather gets warmer. If you do see any damaged and black leaves simply trim them back after the danger of frost has passed.
Leaves turning yellow and dropping
In the height of summer, at the end of July and beginning of August, you might notice that some of the leaves are turning yellow or dropping off. Rest assured this is part of the natural cycle and will lead to new growth in the spring.
These plants do not like being moved so it’s important that when you plant them you find a permanent home for them. If they outgrow the space in which they were planted you are much better off pruning them back so that they fit the area more effectively rather than transplanting. If for some reason it is planted in an untenable location and it is damaging the plants, when you do make the decision to transplant do it only in the spring.
Repotting
If you have your plant in a container and you need to re-pot it, you can do so after every two or three years into a much larger pot. In the meantime, however, you can remove the top 5cm of soil annually and add new soil on top to keep the plant healthy and add some nutrients back to the soil.
Pruning – prune at the end of spring
When you prune the plant to make it fit the space or to get rid of unwanted growth do it at the end of spring. First, remove any leaves that have turned yellow and remove any shoots that were damaged by frost.
How to prune
As your shrub reaches maturity you will notice that there are straggly stems here and there and you will be pleased to know can be removed successfully. Rest assured, that new shoots will grow again out from the base. By removing the bare stems and allowing room for the new shoots it will keep very dense and you can avoid having bare stems at the bottom with nothing but bright foliage at the top.
In order to keep the plant growth to the bushy size that you need for your space, you can prune it heavily. For this, you can cut back the older stems all the way to the ground to help rejuvenate the shrub. When you do this cut the remainder of the stems back to 60cm. Try to make each of your cuts directly above a side stem so that you can maintain the branching shape of your plant.
If you have noticed that the centre of the plant has become overcrowded you can remove the thickest central stems all the way back to the ground and this will reduce the risk of diseases that manifest as a result of poor air circulation.
If you have your plants grown in pots obviously regular pruning is necessary on a more habitual basis to maintain its size.
Regardless of whether they are planted in pots or in the ground, after you prune you should apply fertiliser to help the plant recover.
Propagating
There are different methods you can use for propagating. You can use seeds, layering or cuttings.
Layering
The easiest way to propagate your Fatsia japonica is with layering. Using this method you take a cutting and you allow it to root before you actually cut it away from the main plant so that it still feeds off the main plant during its development.
To do this select a stem that can reach the ground easily without breaking. Make a cut into that stem where it touches the ground but do not cut more than halfway through. The part that has been cut should be buried in the soil. You may need to hold it down with a stone or some sort of support structure. After this, you want to place a stick in the ground and tie it off, next to the branch to make sure the branch remains upright.
You will notice that this cutting will begin to grow roots, and when it does you can cut it the remainder of the way away from the parent plant and add it to a pot.
Semi hardwood cuttings
Another option is to use cuttings. If you plan to use cuttings, take them in the summer when the new growth is just starting to get hard and woody. These are known as semi-hardwood cuttings.
You want to prepare any pots with a potting compost and add a bit of sand to increase the drainage. Once you have placed the potting mix into the pots, use a pencil or stick to create the holes into which the cuttings will be placed.
Cut the soft tip of the stems,and from that divide the remainder into cuttings of 10-15cm in length. Make sure that the base is just above a leaf node because this is where your roots will form. Remove any lower leave and cut larger leaves in half to prevent a loss of moisture.
It is best if you dip the ends of the cuttings in a hormone rooting powder to encourage better growth.
Place each cutting into a pot approximately 5cm deep. Cover the pots with plastic and secure them in whatever fashion you are able to. This will increase the humidity and expedite the growth of the roots. Make sure that the plastic doesn’t actually touch the cuttings. Water and allow the soil to properly drain so that it is saturated and then place the containers in a sheltered spot away from direct sunlight. You can place them in a greenhouse or on a heating pad designed for propagation. There are many options.
Once a week you should take the plastic off to water the plants and allow them an opportunity to get some air circulation. If you see any dead material or dying matter, remove it. After a month or so you should be able to transplant into bigger pots and eventually outside once the roots have taken place.
Seeds
You can also propagate with seeds and for this method you need to wait until the berries are completely ripe. Then remove the flesh from around the seeds and press the seeds directly into moist potting soil. It is best to use a seed tray if you are going to do this. You don’t want to cover the seeds because they do need direct light to germinate, so simply set your seed tray facing a window sill and keep it moist.
Once you see the seeds develop true leaves and they have grown large enough that you can handle them individually, place them in pots. At this point you will need to use the same propagating method that you do for hardwood cuttings where you place them in pots, water the pots, cover the pots and allow them to germinate completely and develop root structures.
Given that you take the seeds later in the season, you will need to keep the seeds (as they propagate) inside over the winter, and then once the weather warms up the following season you can harden them off by placing them outdoors for small amounts of time each day until they are accustomed to the outdoor weather. Once that happens you can transplant them outside.
Pest, diseases and other problems
The Fatsia japonica is a tropical looking plant and very tough, which means it rarely has issues with diseases and pests, however, it can still be affected by aphids and caterpillars.
Pests
Aphids are theoretically easy to get rid of because you can just remove them with a strong soap solution or stream of water, however, if you don’t get rid of each and every one they will come back. Caterpillars can be removed by hand but you need to search every single leaf to get to them.
If you see that your plant has been affected by capsid bugs and your new growth has already been eaten away and your flowers are distorted, you should cut back any parts that you see which are affected and get rid of any weeds nearby because these could be acting as a host. If the problem is very severe you can apply an insecticide but don’t do it during the flowering time as this will harm the insects pollinating the flowers.
Diseases
In terms of disease, your plant may be affected by fungal diseases, in which case you will see blotches growing on the leaves. You can reduce the chance of fungal diseases by improving air circulation and thinning out crowded branches. It is best to cut back on anything that might be encroaching on the plant. Also, remove any dead material immediately. When you water, do it at the roots not on the leaves and do it early in the morning.
If you see small brown holes or small brown spots that turn into holes this is called shot hole disease. It is also a fungal disease and the best thing you can do is remove any damaged parts to your plant and remove any weeds in the surrounding area. This will help prevent the spread of the disease and eventually your plant will recover.
Designing your garden
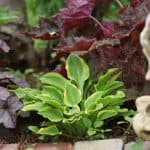
If you have the Fatsia japonica in your garden, it will function beautifully as a specimen plant, especially if you have it in front of a brick wall or you place it in a large pot on your patio. However, you can use this plant to provide structure and colour for a tropical garden and allow it to be a backdrop for other plants such as hostas, crocosmia or canna lilies. The rounded leaves that the plant has will contrast the spikes or the leaves that you get from tall grasses or bamboo if that’s a look you prefer.
You can also combine it with other evergreen plants that offer different coloured leaves throughout the year, adding a less monochromatic feel to your space.
Image credit – Shutterstock